
Is Your Basement Window Sealant Doing Its Job?
Choosing the right basement window sealant can protect your home from water damage, mold, pests, and energy loss all at once.
Quick answer: The best basement window sealants are:
- 100% silicone — best waterproofing, lasts up to 10 years, not paintable
- Polyurethane — paintable, rubbery finish, excellent for joints that expand and contract
- Hybrid polymer — combines silicone and polyurethane strengths, paintable, great flexibility
For most Colorado Springs homeowners dealing with drafts or moisture, a high-quality exterior-grade sealant and a clean application are all that stand between a dry basement and a costly water problem.
Gaps around basement windows are more serious than they look. Moisture intrusion through unsealed basement windows is a leading cause of mold growth, with 21% of U.S. homes reporting mold issues linked to foundation leaks. And it’s not just water: small gaps let in cold air, insects, and humidity year-round.
If you’ve noticed visible light coming through your window frame, felt a draft near the sill, or spotted gnats appearing out of nowhere, your sealant is likely failing.
I’m Michael Smith, owner of Complete Window Care and an AAMA-certified window installation instructor with over 18 years of experience diagnosing air and water infiltration issues, including basement window sealant failures, across Colorado Springs and the Front Range. In this guide, I’ll walk you through exactly what to buy, why it matters, and how to apply it correctly.
Why Basement Windows Leak and the Risks of Failing Seals
Basement windows live in a harsh environment. Unlike upper-story windows, they are positioned at or below ground level, making them highly vulnerable to water accumulation, dirt, and constant pressure from the surrounding soil.
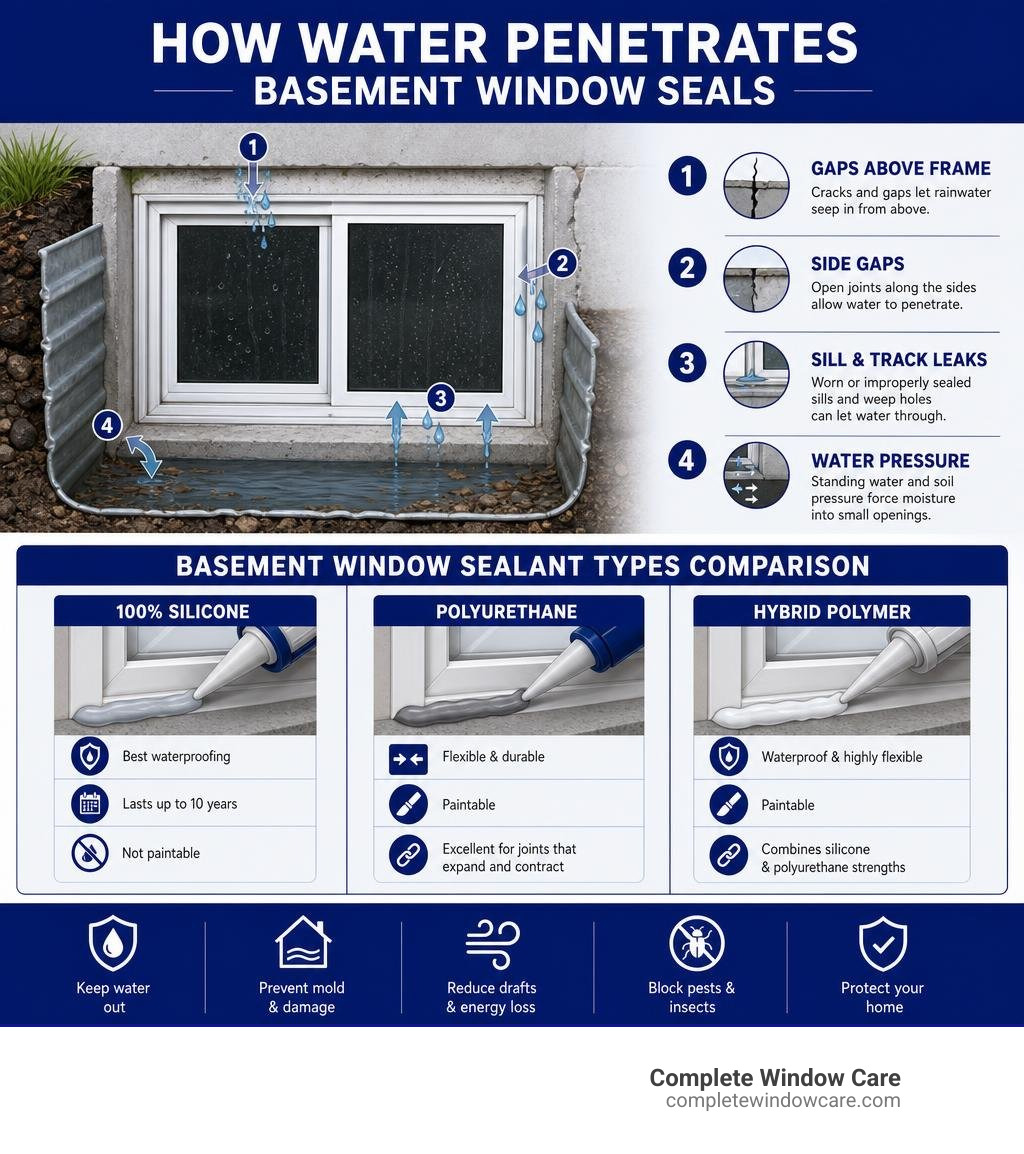
The most common culprit behind a leaking basement window is groundwater exposure. When heavy rains or melting snow saturate the soil around your foundation, hydrostatic pressure forces water toward any path of least resistance. If your window sealant has cracked, shrunk, or pulled away from the masonry, water will find its way inside.
Additionally, Colorado Springs is known for its expansive soils, which swell when wet and shrink when dry. This constant shifting causes foundation movement. Over time, these subtle shifts warp window frames and tear the sealants holding them to the concrete.
Ignoring a failing seal can lead to several serious issues:
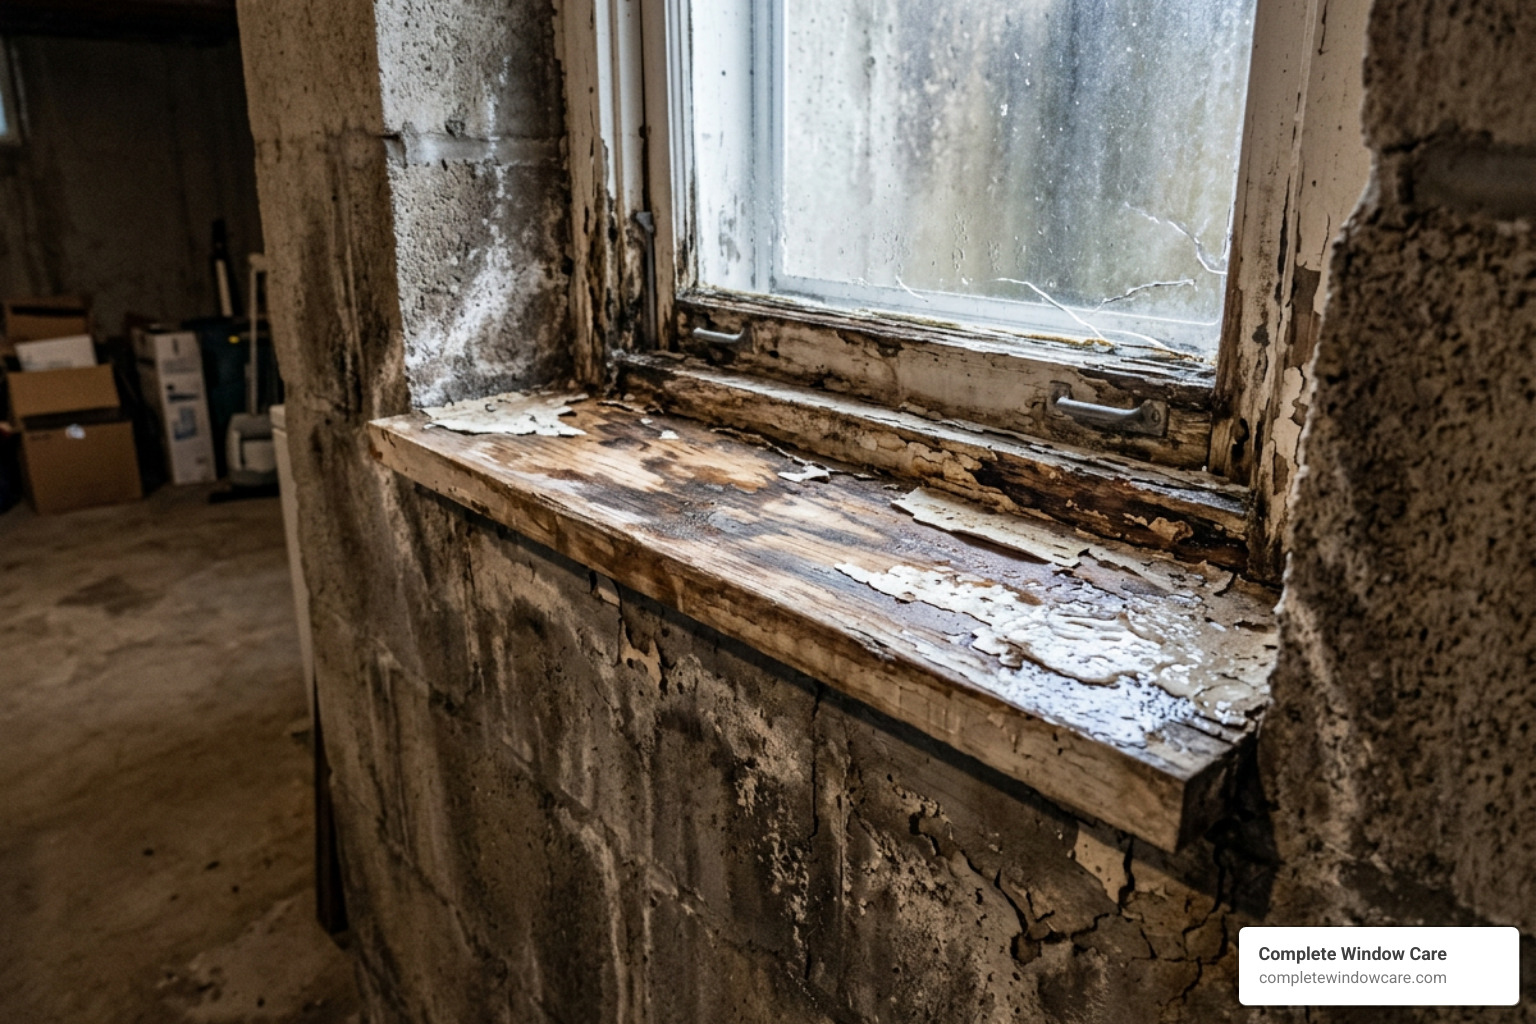
- Wood Rot and Structural Damage: Water pooling on the wooden sill or framing can rot the wood, compromising the window’s structural integrity.
- Mold and Mildew Growth: Basements are naturally humid. Adding external moisture to this dark environment creates the perfect breeding ground for mold, which can quickly spread to your drywall and carpets.
- Pest Intrusion: Gaps around your window frame act as an open invitation for spiders, ants, and gnats.
- Energy Loss: Properly sealed basement windows can reduce energy loss by up to 30% in homes with below-grade living spaces. When seals fail, your heating and cooling systems have to work much harder.
To protect your home, it is important to understand the consequences of leaky windows and address them before they escalate into expensive foundation or structural repairs.
Telltale Signs Your Basement Window Sealant is Failing
You don’t always have to wait for a indoor puddle to know your window seals are in trouble. In fact, catching the warning signs early can save you thousands of dollars in remediation costs.
First, perform a visual inspection. If you can see daylight peeking through the edges of the window frame from inside your basement, your sealant has completely failed. Even if you don’t see light, look closely for peeling, cracking, or crumbling caulk on both the interior and exterior sides of the window.
Another major indicator is localized condensation. While some window condensation is normal, persistent moisture trapped between the window frame and the concrete wall indicates a broken barrier. Drafts are also a dead giveaway. If you feel a cool breeze when standing near the window on a windy day, the air barrier is gone.
Finally, keep an eye out for pests. If you notice gnats or tiny insects consistently gathering near the window sill, they are likely drawn to the organic moisture and damp soil leaking through the gaps. Learning how to spot hidden window leaks is a valuable skill that every homeowner should practice at least twice a year.
Choosing the Best Sealant: Silicone vs. Polyurethane vs. Hybrid
When you walk down the sealant aisle at your local home improvement store, the sheer number of options can be overwhelming. For below-grade masonry and window applications, you must choose an exterior-grade product that can handle moisture, temperature swings, and joint movement.
Let’s break down the three primary types of basement window sealant:
- 100% Silicone Caulk: Silicone is the gold standard for waterproofing. It is completely waterproof, shrink-proof, and crack-proof. It remains highly flexible across extreme temperatures (from -55°F to 400°F) and provides up to 10 years of mold-free protection. However, standard silicone is not paintable, meaning you must buy it in the color that matches your trim (usually white, clear, or gray).
- Polyurethane Caulk: Polyurethane offers superior adhesion to porous materials like concrete, brick, and stone. It dries to a very tough, rubbery finish that can withstand heavy expansion and contraction without tearing. Best of all, polyurethane is fully paintable, allowing you to seamlessly blend the seal into your home’s exterior color scheme. The downside is that it can be more difficult to tool (smooth out) and has a slower cure time.
- Hybrid Polymer: Hybrid sealants combine the best features of silicone and polyurethane. They offer the permanent flexibility and weather resistance of silicone, alongside the paintability and strength of polyurethane. Many hybrids can even be applied to damp or wet surfaces, making them incredibly convenient for quick repairs.
| Feature | 100% Silicone | Polyurethane | Hybrid Polymer |
|---|---|---|---|
| Waterproofing | Excellent | Very Good | Excellent |
| Paintability | No (typically) | Yes | Yes |
| Flexibility | Extremely High | High | High |
| Adhesion to Concrete | Good | Excellent | Excellent |
| UV Resistance | Excellent | Moderate | Very Good |
| Ease of Tooling | Easy | Moderate | Easy |
Choosing the Right Basement Window Sealant for Your Project
When choosing a basement window sealant, start by matching the formula to the joint and the conditions around it:
- Choose 100% silicone when maximum water resistance and UV durability matter most. It is a strong choice for stable exterior joints, but confirm that the color works for your trim because most silicone is not paintable.
- Choose polyurethane when you need especially strong adhesion to concrete, masonry, brick, or stone and want to paint the finished bead. It is well suited to joints that move with seasonal temperature changes, though it may take longer to cure.
- Choose a hybrid polymer when you want a paintable, flexible option with reliable weather resistance. Many hybrid products are easier to apply in cool or slightly damp conditions, but always follow the manufacturer’s surface-preparation and curing instructions.
Before buying, check the label for exterior use, compatibility with both the window-frame material and the surrounding masonry, and an ASTM C920 rating for movement capability. Also consider whether the joint will be painted, exposed to direct sun, or regularly wet. For gaps wider than about 1/4 inch, use foam backer rod first so the sealant can form a durable, flexible joint rather than a thick bead that may crack or pull away.
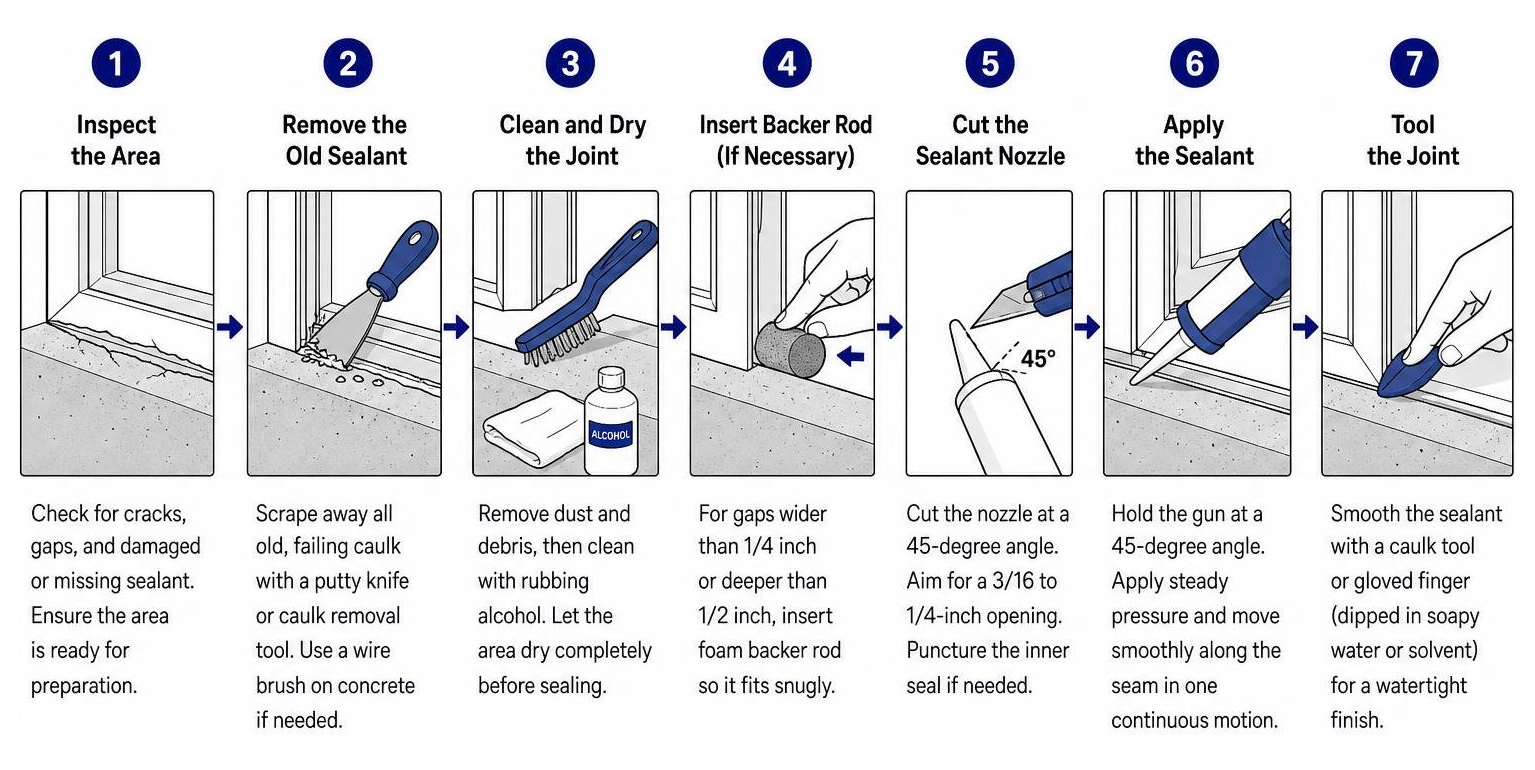
Step-by-Step Guide: How to Seal a Basement Window
Sealing a basement window is a highly approachable DIY project, but your results depend entirely on your preparation. Applying new caulk over old, dirty caulk is a recipe for immediate failure.
Follow this step-by-step process to ensure a professional-grade, watertight seal:
Step 1: Gather Your Tools and Materials
Before starting, make sure you have:
- High-quality basement window sealant (silicone, polyurethane, or hybrid)
- Caulking gun
- Putty knife or caulk removal tool
- Wire brush (essential for cleaning concrete)
- Damp cloth and rubbing alcohol
- Foam backer rod (for gaps wider than 1/4 inch)
- Caulk smoothing tool (or a gloved finger and water/solvent)
Step 2: Remove the Old Sealant
Using your putty knife or caulk removal tool, scrape away every bit of the old, failing caulk. Be gentle around vinyl or wood frames to avoid gouging the material. For stubborn residue on concrete, use a stiff wire brush to scrub the surface clean.
Step 3: Clean and Dry the Joint
Wipe down the entire joint with a damp cloth to remove loose dust and debris. Next, clean the window frame and concrete with rubbing alcohol to strip away any remaining oils or grease. Let the area dry completely. If you are using a standard silicone or polyurethane, the surface must be bone dry for proper adhesion.
Step 4: Insert Backer Rod (If Necessary)
If you have gaps wider than 1/4 inch or deeper than 1/2 inch, do not try to fill them entirely with caulk. The caulk will sag and fail to cure correctly. Instead, press a foam backer rod into the gap. The backer rod should be slightly wider than the gap itself so it fits snugly, leaving about 1/4 inch of depth for the sealant.
Step 5: Cut the Sealant Nozzle
Cut the plastic nozzle of your sealant tube at a 45-degree angle. For most basement windows, a 3/16-inch to 1/4-inch bead is ideal. If your tube has an inner foil seal, make sure to puncture it using a long nail or the metal wire on your caulking gun.
Step 6: Apply the Sealant
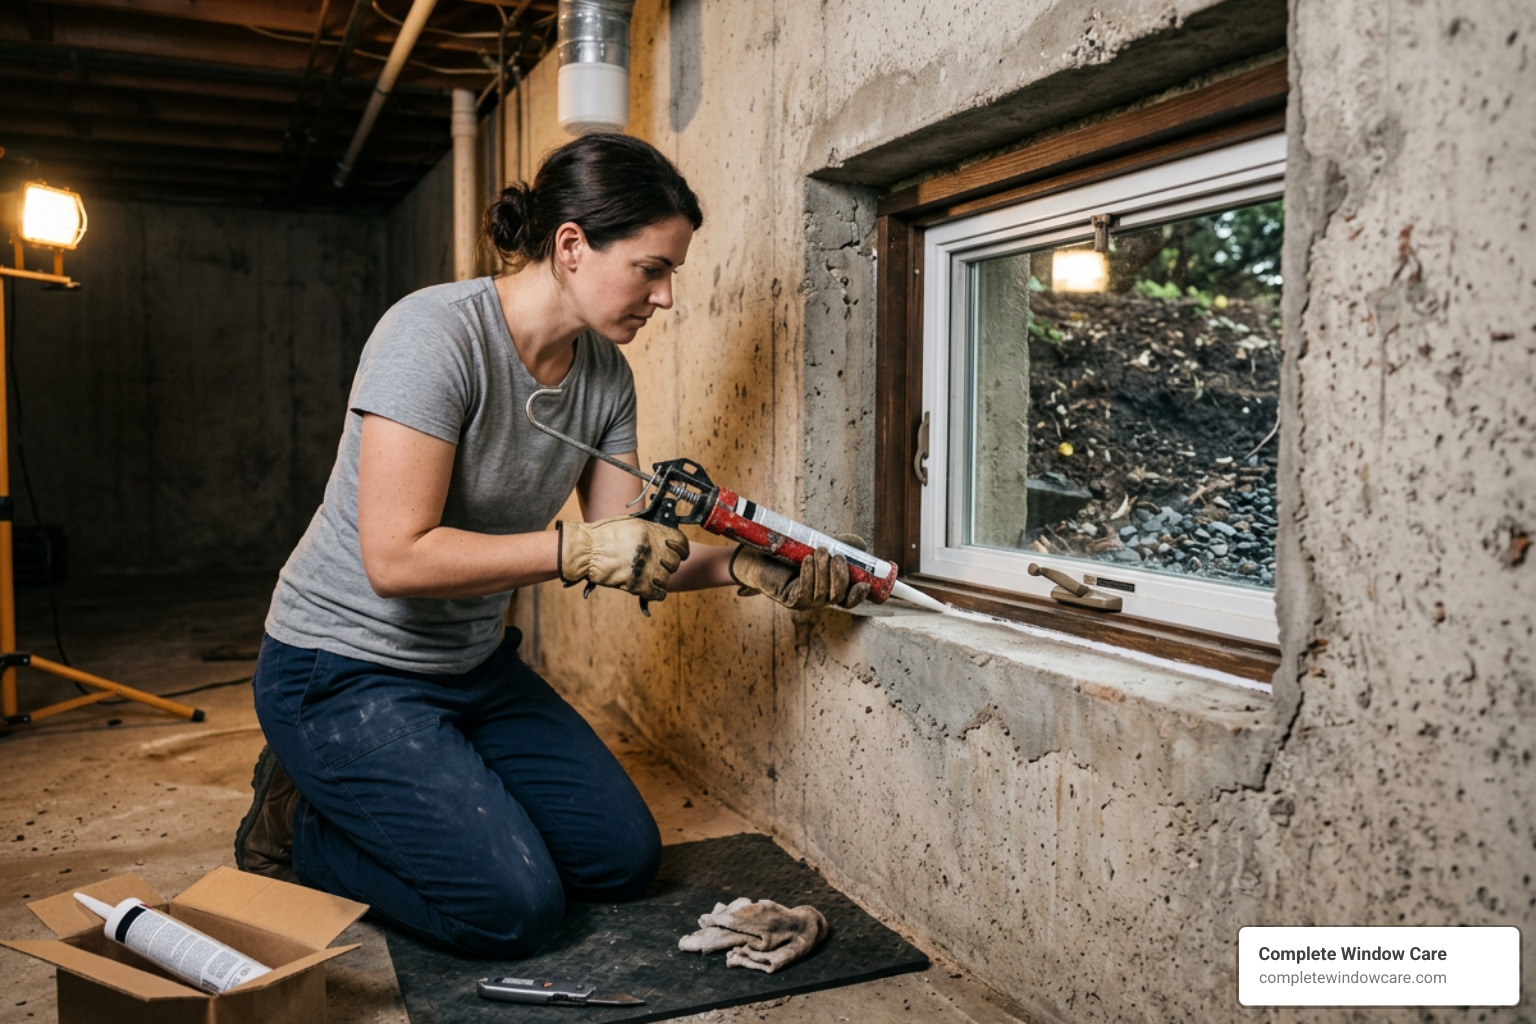
Hold the caulking gun at a 45-degree angle to the joint. Squeeze the trigger with steady, consistent pressure and move the gun smoothly along the seam in one continuous motion. Ensure the bead contacts both the window frame and the concrete foundation wall.
Step 7: Tool the Joint
To ensure a watertight seal, you must “tool” the caulk. Tooling presses the sealant deep into the joint and creates a smooth, concave surface that sheds water. Run a caulk smoothing tool or a gloved finger (dipped in soapy water for silicone, or mineral spirits for polyurethane) lightly over the bead.
For more tips on what to do, and what to avoid, during this process, review our guide on the dos and don’ts of window repair.
Beyond Caulking: Comprehensive Water Prevention Strategies
While high-quality basement window sealant is your first line of defense, it cannot work miracles. If water is constantly pooling against your window, even the best sealant will eventually fail under the pressure. To truly protect your basement, you must address the root causes of water accumulation.
First, inspect your foundation grading. The ground surrounding your home should slope away from the foundation at a rate of at least 1 inch of fall per foot for the first 6 feet. If the ground slopes toward your house, rainwater and snowmelt will flow directly into your basement windows.
Second, optimize your window wells. If your basement windows are below ground level, they require window wells to keep soil away from the glass. Ensure your window wells have a clean layer of gravel at the bottom (at least 4 to 6 inches deep) to facilitate drainage. Replacing old, dirty gravel in window wells can prevent up to 90% of water pooling issues.
Third, install window well covers. High-quality plastic or metal covers keep rain, snow, leaves, and debris out of your wells. Debris can easily clog the drains at the bottom of the well, turning it into a small swimming pool during heavy rain. If you are unsure how to secure these areas, learning how to seal a window well is a crucial next step.
Finally, ensure your egress windows are fully functional. Egress windows are large basement windows designed for emergency escapes. Because of their size, they require deep wells that must be kept clear of obstructions and properly drained to prevent catastrophic basement flooding.
Frequently Asked Questions about Basement Window Sealant
How long does exterior-grade sealant last before needing replacement?
On average, high-quality exterior-grade silicone or hybrid sealant lasts between 5 to 10 years. However, its actual lifespan depends heavily on environmental exposure.
Here in the Pikes Peak Region, our intense high-altitude UV rays and extreme temperature swings (hot summer days followed by freezing winter nights) accelerate the degradation of building materials. We recommend inspecting your basement window seals at least once a year, ideally in the spring, to look for signs of drying, cracking, or shrinking.
When should I call a professional instead of DIY sealing?
If you are dealing with minor drafts, small gaps, or old crumbling caulk, a DIY sealing project is perfectly fine. However, you should call a professional if you experience any of the following:
- Structural Concrete Cracks: If you see large, stair-step cracks in your concrete foundation walls near the window, this indicates structural movement that caulk cannot fix.
- Warped or Rotted Frames: If the window frame itself is warped, rotting, or rusted through, the window needs to be repaired or replaced.
- Persistent Flooding: If your window well fills with water during every storm despite your sealing efforts, you likely have a systemic drainage or grading issue.
In these cases, scheduling professional leak inspections is the safest way to identify the source of the leak and prevent structural damage to your home.
Can I apply sealant to wet or damp basement window frames?
It depends entirely on the type of sealant you are using. Standard 100% silicone and polyurethane sealants require completely dry surfaces to bond correctly. If applied to a damp surface, they will trap moisture underneath, fail to adhere, and peel away shortly after curing.
However, advanced hybrid polymer sealants (such as DAP AMP) are specifically engineered to cure in the presence of moisture and can be applied directly to wet or damp surfaces. This makes them excellent for emergency repairs during a rainy season.
Conclusion
Sealing your basement windows is one of the most cost-effective ways to protect your home from water damage, mold, pests, and high energy bills. By choosing the right basement window sealant- whether it is a highly flexible 100% silicone, a paintable polyurethane, or a versatile hybrid polymer- and applying it with proper preparation, you can enjoy a dry, comfortable basement for years to come.
At Complete Window Care, we specialize in helping Colorado Springs homeowners preserve their existing windows. Our core philosophy is built on providing cost-effective repairs over full, expensive replacements whenever possible. Whether you need a professional leak investigation, glass repair, or help understanding how to handle a broken window seal, our experienced team is here to help.
If you suspect your basement windows are letting in more than just a little light, don’t wait for the next heavy Colorado storm to find out. Contact us to schedule an inspection and keep your home safe, dry, and energy-efficient.