
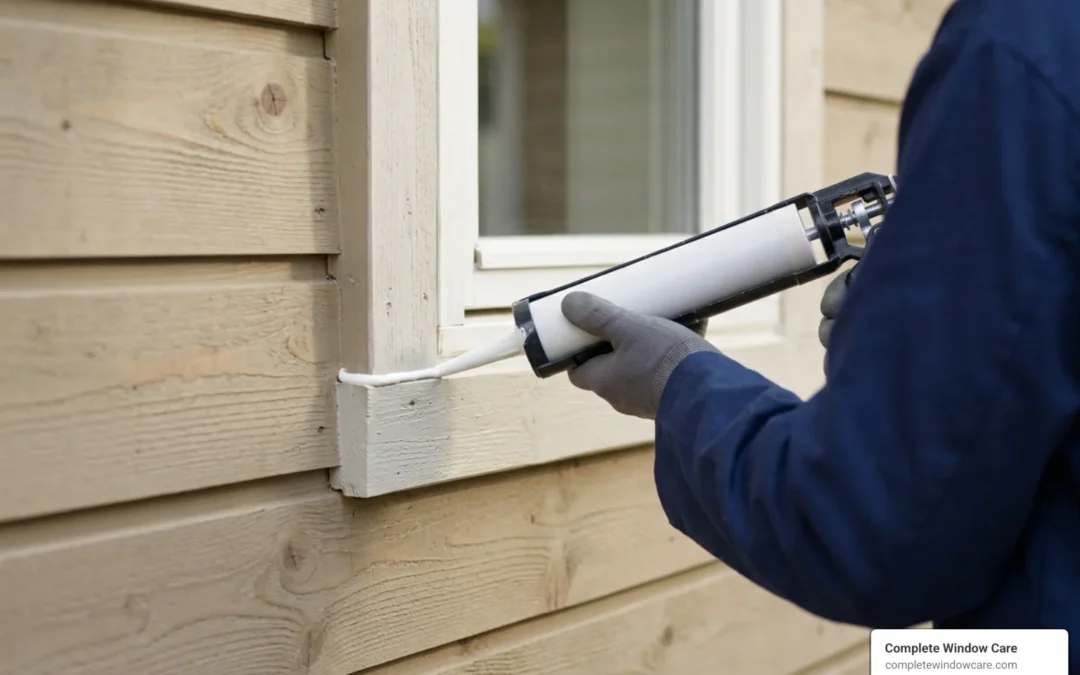
Seal Drafty Window Frames Before They Waste More Energy
Sealing window frames starts with finding the leak, removing failed caulk, cleaning and drying the joint, then applying the right flexible sealant in a continuous bead. For wider gaps, install backer rod first so the caulk can flex instead of cracking. Do not seal window weep holes or moving sash gaps, since those parts need to drain water and operate properly.
A quick test can confirm the problem. On a windy day, hold a thin piece of paper or an incense stick near the window frame and trim. If the paper moves or the smoke shifts, outside air is getting in.
Drafts make Colorado Springs homes less comfortable during cold winters and hot, dry summers. They can also contribute to moisture stains, peeling paint, pests, and higher heating or cooling use. Resealing a sound window frame is often a practical repair when the glass and frame are still in good condition.
At Complete Window Care, our certified window and door service team brings more than 18 years of hands-on repair experience to air leak diagnostics, water leak investigations, frame repairs, and glass service across Colorado Springs and the Pikes Peak Region. Our goal is to help homeowners choose effective repairs, including sealing window frames, when replacement is not necessary.
Signs Your Windows Need Immediate Attention: Reseal vs. Replace
Unsealed window perimeters act like open seams in your home’s exterior envelope. Up to 30% of a home’s heat can escape directly through leaky windows and unsealed frames. When cold air infiltrates around the perimeter, your HVAC system must work significantly harder, which explains how leaky windows can raise utility bills month after month.
In our region, extreme daily temperature swings cause building materials to expand and contract constantly. This thermal movement is one of the common causes of drafty windows in Colorado Springs winters, leading to cracked exterior joints, failing sealants, and noticeable air infiltration.
Identifying Drafts, Moisture Leaks, and Energy Loss
Locating the exact path of air leakage does not require expensive tools. You can perform a few simple diagnostic tests around your window frame:
- The Smoke or Incense Test: Light an incense stick or a candle and slowly trace it along the interior window trim, stool, and outer sash edges on a breezy day. If the smoke wafts horizontally or flickers wildly, you have located a point of active infiltration.
- The Paper Draft Test: Close your window sash on a standard dollar bill or slip of paper. If you can pull the paper out with no resistance, the weatherstripping or frame alignment needs attention.
- Visual Seam Inspection: Look closely at the exterior perimeter where the window casing meets your siding, stucco, or brick. Check for shrinking, chalking, cracking, or missing beads of sealant.
- Moisture and Paint Clues: Peeling paint on the sill, water stains on the drywall underneath the frame, or soft wood are telltale signs of water intrusion alongside air drafts.
Addressing these issues early with targeted maintenance helps prevent minor perimeter gaps from turning into severe water damage. When you need a professional diagnosis, Complete Window Care can provide window leak inspection services that identify whether the issue is failed sealant, rough opening leakage, glass failure, or hidden frame damage.
Frame Perimeter Sealing vs. Glass Unit Replacement
A common point of confusion for homeowners is distinguishing between a drafty frame perimeter and a failed insulated glass unit (IGU). Caulking around your window frame seals the joint between the window unit and the wall rough opening. It stops outdoor air from blowing around the frame.
However, if you notice permanent fogging, haze, or moisture droplets trapped between the two glass panes, the factory hermetic seal of the glass unit has failed. In that scenario, understanding broken window seal symptoms becomes essential because no amount of exterior perimeter caulk can restore a compromised insulated glass unit. Replacing the glass pane restores thermal efficiency without the expense of ripping out the entire window frame.
| Issue | Perimeter Frame Leak | Insulated Glass Unit Failure | Structural Frame Damage |
|---|---|---|---|
| Primary Symptom | Cold drafts around trim, whistling air, external water leaks | Fog, moisture, or mineral haze trapped between panes | Soft/rotted wood frame, warped vinyl, sash won’t operate |
| Root Cause | Failed or cracked exterior caulk, unsealed rough opening | Degraded factory edge spacer seal around the double pane | Long-term water intrusion, wood decay, structural shifting |
| Corrective Action | Remove old sealant, insert backer rod, apply exterior caulk | Replace the insulated glass unit while keeping the existing frame | Full window unit replacement or structural carpentry repair |
| DIY Feasibility | High for straightforward ground-floor projects | Low because it requires custom glass fabrication and glazing tools | Low because it requires structural carpentry and exterior integration |

Choosing the Right Sealant, Foam, and Weatherproofing Materials
Selecting the proper product is critical for a durable seal. Many sealants fail within a couple of seasons simply because the wrong chemistry was applied to the joint. Understanding why window sealants matter means matching joint movement capability, UV exposure, and substrate compatibility.
For exterior window perimeters, look for sealants tested against ASTM C920 with a movement capability rating of at least Class 25, allowing plus or minus 25% joint movement. High-movement joints require elastic formulations rather than rigid fillers, especially on exterior frames exposed to UV, wind, snow, and strong temperature swings.
Silicone vs. Acrylic Latex vs. Hybrid Formulations
- 100% Silicone (Neutral-Cure): The gold standard for exterior window perimeter sealing. Silicone maintains elasticity across extreme temperature fluctuations, resists UV degradation, and is completely waterproof. Use neutral-cure silicone for vinyl, aluminum, and masonry frames to avoid chemical etching or corrosion. Note: 100% silicone cannot be painted.
- Acrylic Latex (Painter’s Caulk): Best suited for interior trim and baseboards. Acrylic caulk is easy to tool, cleans up with water, emits low odor, and takes paint readily. However, it hardens over time, has low movement capability, and will crack if used on high-exposure exterior perimeters.
- Hybrid Formulations (MS Polymers / Polyurethane): These advanced sealants combine the weather resistance and elasticity of silicone with the paintability of acrylics. They adhere exceptionally well to wood, fiber cement, and masonry, making them ideal when you need to match exterior trim paint.
Materials and Preparation for Sealing Window Frames
Before starting, gather the appropriate tools to ensure a clean, professional finish:
- High-Quality Dripless Caulk Gun: A smooth-rod caulk gun with a thumb-activated pressure release gives you total control over material flow and prevents messy drips.
- Heavy-Duty Utility Knife and Caulk Removal Tool: For slicing away old, hardened sealant.
- Closed-Cell Backer Rod: Foam backer rods sized 25% wider than the gap provide depth control and prevent three-sided adhesion in joints wider than 1/4 inch.
- Cleaning Solvent: Isopropyl alcohol or mineral spirits helps remove oil, wax, and microscopic residue from vinyl and aluminum surfaces.
- Painter’s Masking Tape: High-tack tape helps mask straight boundary lines along siding and frame edges.
- Sash Components: If drafts are blowing through moving sashes rather than the frame perimeter, replace worn pile or rubber seals with dedicated window weatherstripping options.
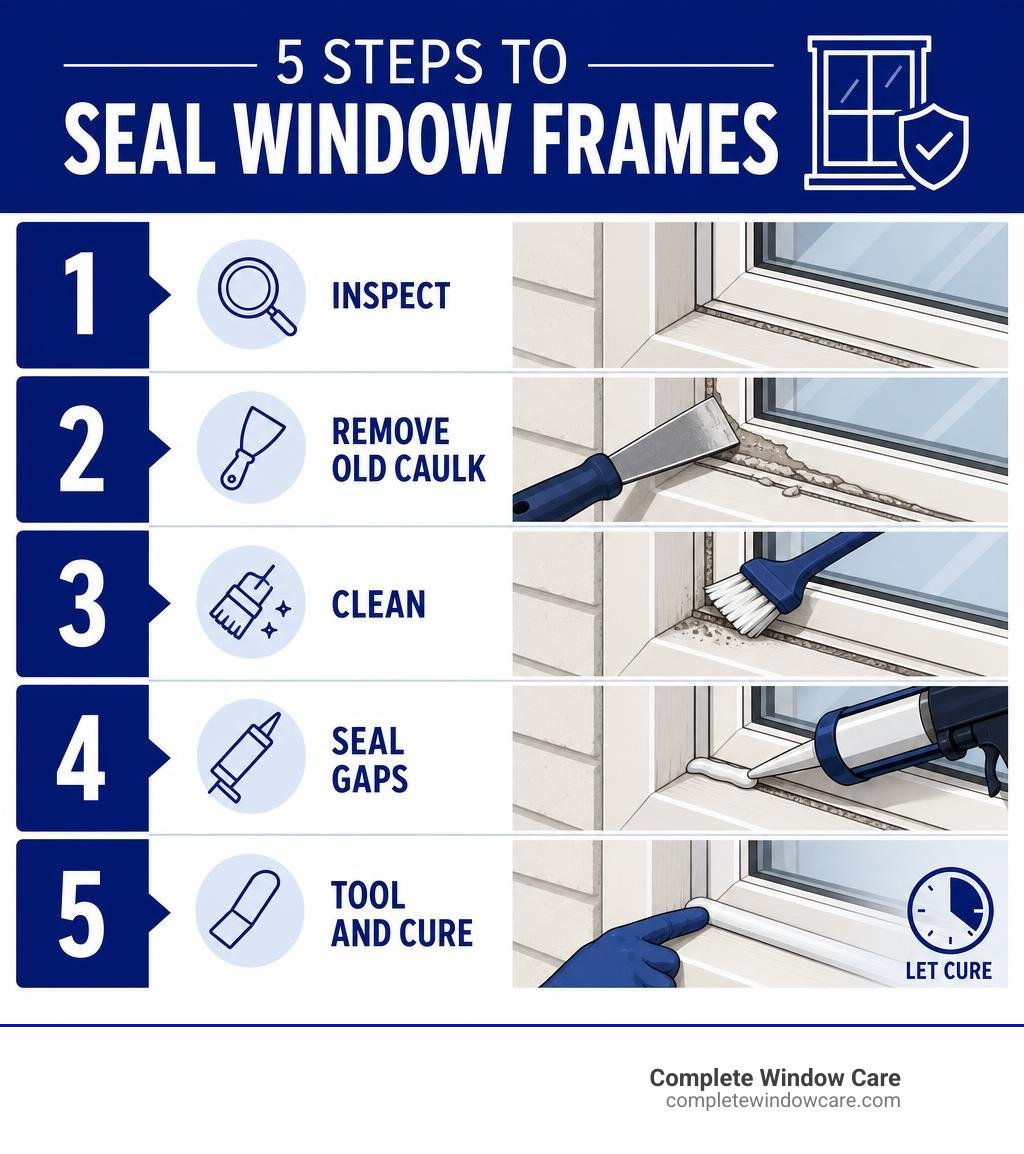
Sealing Window Frames in 5 Practical Steps
Following a systematic approach ensures an airtight, watertight seal that will last for years. If you are addressing several draft points, these practical ways to repair a drafty window can help you decide whether frame caulking, weatherstripping, sash adjustment, or glass service is the right next step.
Step 1 and 2: Removing Old Caulk and Preparing the Surface
Step 1: Strip Failed Sealant Completely
Never apply new caulk directly over old caulk. Old sealant is often contaminated with dirt, oxidized, or unbonded from the substrate, which prevents the new bead from sticking. Slice along both edges of the old caulk bead with a sharp utility knife, pull out the strip, and scrape stubborn remnants using a 5-in-1 tool or rigid putty knife.
Step 2: Clean and Dry the Substrate Thoroughly
Scrub the joint channel with a stiff nylon brush to remove loose mortar, dirt, and peeling paint. Wipe the frame and siding contact surfaces thoroughly with a rag dampened with isopropyl alcohol to dissolve oils.
Crucial rule: The joint must be 100% dry. Applying sealant over trapped moisture guarantees adhesive failure and invites hidden rot.
Step 3, 4 and 5: Inserting Backer Rod, Applying Bead, and Tooling
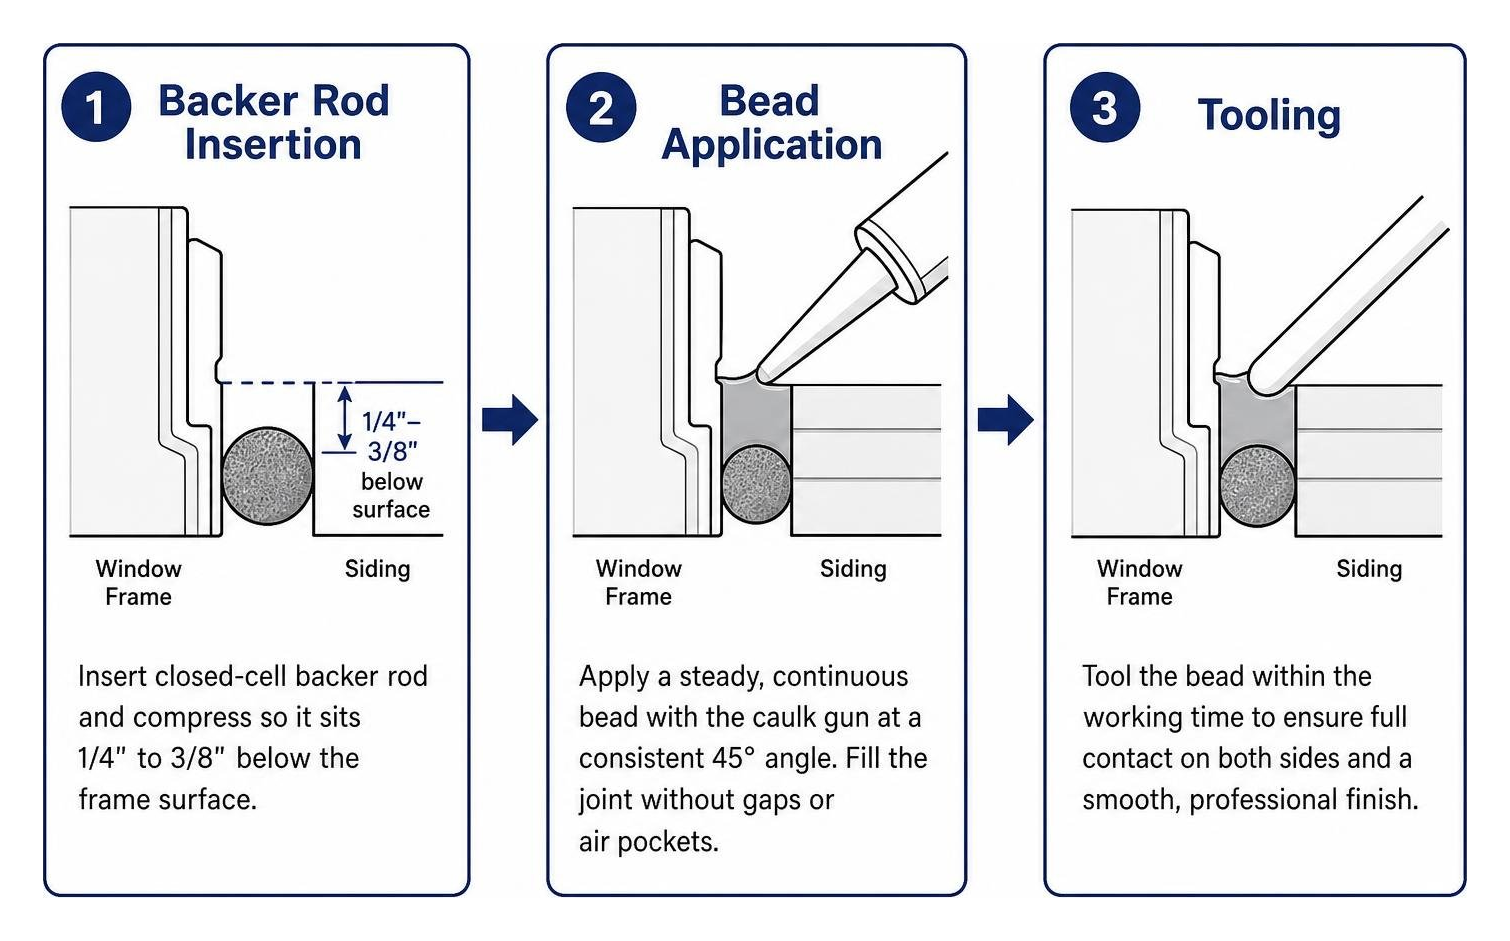
Step 3: Insert Closed-Cell Backer Rod
For joints wider than 1/4 inch or deeper than 1/2 inch, insert a closed-cell foam backer rod into the seam using a blunt putty knife. Compress the rod so it sits roughly 1/4 inch to 3/8 inch below the frame surface. The backer rod serves two vital functions: it controls sealant depth and ensures two-point adhesion, bonding only to the window frame and the siding rather than the back of the cavity, so the sealant can stretch freely like a rubber band.
Step 4: Apply a Steady, Continuous Bead
Cut the nozzle of your sealant cartridge at a 45-degree angle to match the gap width. Puncture the inner foil seal. Hold the caulk gun at a consistent 45-degree angle, push the gun forward into the joint or pull with steady trigger pressure, and dispense an even bead without gaps or air pockets. Maintain a continuous motion along the entire length of the window jamb.
Step 5: Tool the Bead and Allow Proper Cure
Within 5 to 10 minutes of application, smooth and compress the bead using a specialized tooling spatula or a gloved finger lightly misted with a joint finishing solution or soapy water. Tooling forces the sealant firmly against both bonding surfaces and creates a slightly concave profile that sheds water effectively. Proper joint geometry helps prevent stress tears during seasonal building movement. Remove painter’s tape immediately after tooling, and allow 24 to 48 hours for a full cure before exposing the joint to painting or heavy rain.
Advanced Air Sealing Behind Interior Trim and Deep Rough Openings
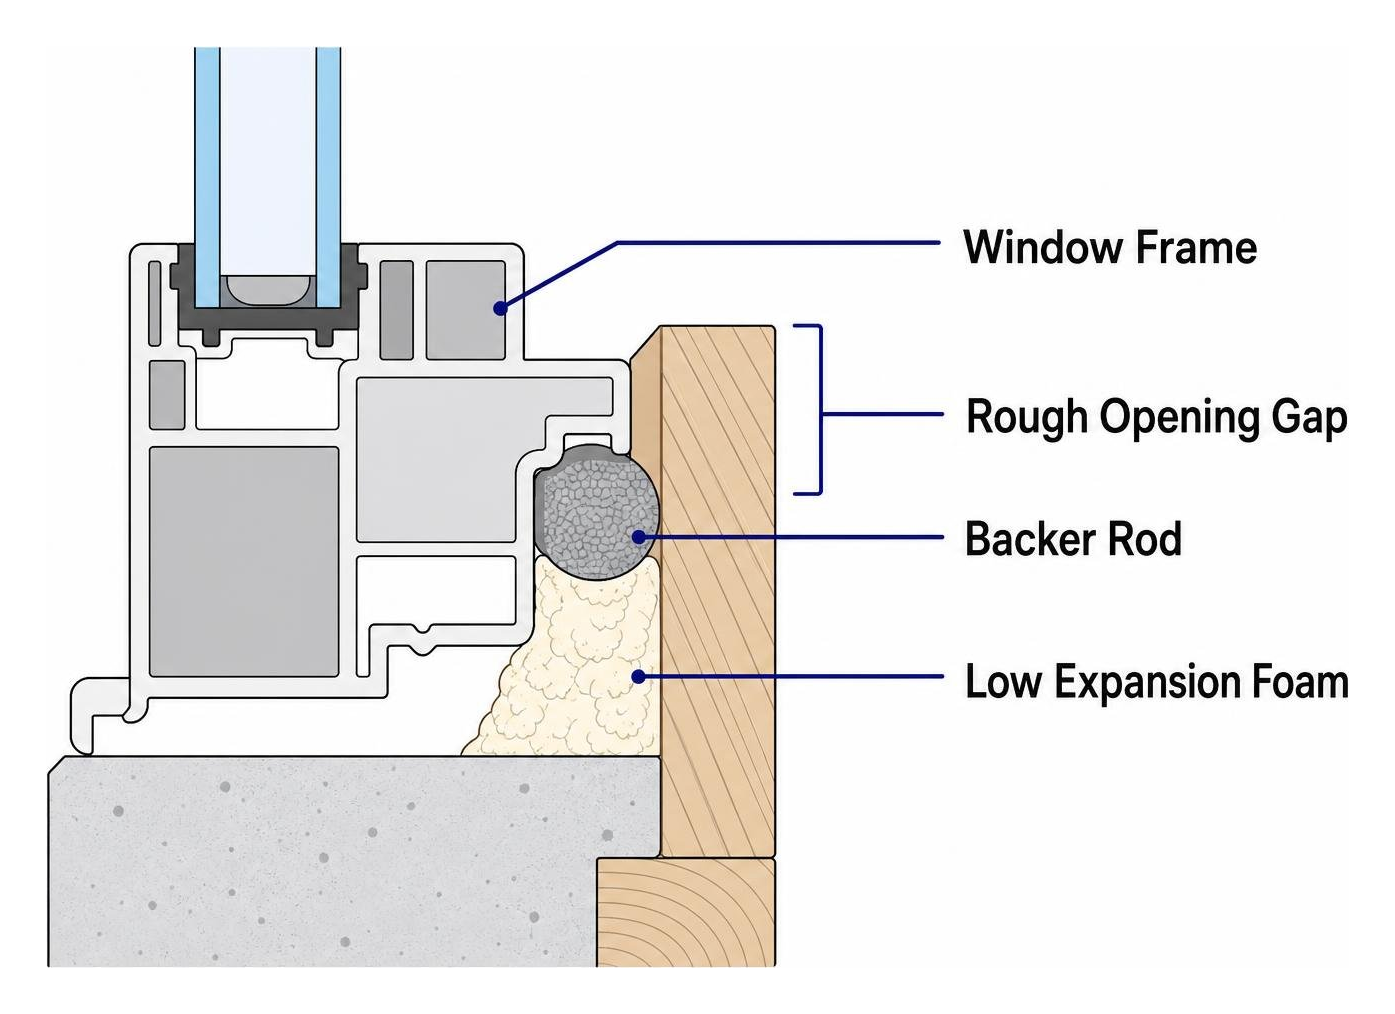
Exterior caulking seals out rain and wind-driven drafts, but extensive energy losses often occur in the hidden cavity behind interior casing trim. When a window is installed, a 1/2-inch to 1-inch rough opening gap surrounds the jamb. If this space was left uninsulated or stuffed with loose fiberglass scraps, outdoor air bypasses the frame entirely.
Addressing this hidden thermal bypass is covered in the ENERGY STAR sealing behind window trim project, which explains how to open and seal deep framing voids.
Lead-Safe Protocols When Sealing Window Frames in Older Homes
If your home was constructed before 1978, the existing interior and exterior trim may contain lead-based paint. Disturbing lead paint during trim removal or aggressive scraping generates fine, toxic dust.
- Contain the Work Area: Lay 6-mil plastic sheeting on the floor stretching at least 6 feet beyond the window perimeter.
- Score Paint Lines First: Always cut through paint seams between the casing and drywall with a sharp utility knife before prying trim off to prevent chipping paint chunks.
- Personal Protection: Wear an approved N100 or HEPA-rated respirator, protective gloves, and safety glasses.
- HEPA Cleanup: Clean all work surfaces using a certified HEPA-filtered vacuum followed by wet wiping with disposable cleaning cloths.
Insulating Hidden Framing Gaps with Low-Expansion Foam
Once you gently remove the interior casing with a pry bar and putty knife, you can seal the hidden rough opening gap:
- Use Low-Expansion Window and Door Foam: Never use high-expansion spray foams designed for general gaps. High-expansion formulations exert immense pressure during curing that can easily bow window jambs, binding sashes and ruining the operation of your window.
- Apply in Controlled Passes: Insert the straw applicator deep into the cavity and fill the void to roughly 50% capacity, allowing the foam room to expand gently outward.
- Preserve Water Drainage: Do not pack foam tightly against the bottom exterior flange. As high-performance building science dictates, the bottom rough sill should remain unobstructed so any incidental water can drain freely to the exterior sill pan.
- Reinstall and Caulk Trim: Once the foam cures completely, trim it flush with a serrated knife, reinstall your casing trim, nail into the framing, and apply a fine bead of paintable acrylic latex along the trim-to-wall joints.
Frequently Asked Questions About Sealing Windows
How much money can I save by sealing window frame air leaks?
Sealing air leaks around window perimeters, trim, and doors can save homeowners up to 10% on their total annual heating and cooling bills. Because standard sealing materials are relatively inexpensive, the project can often pay for itself through improved comfort and reduced energy waste.
Can I seal exterior window frames in cold weather?
Most standard silicones and caulks require ambient temperatures of at least 40°F to 50°F to cure properly. Applying sealant in freezing weather slows skin formation, prevents adequate bonding, and risks moisture condensation on cold substrates. If you must seal during cold months, look for specialized hybrid polymer or cold-weather-rated sealants formulated for sub-freezing application, and ensure the surfaces are free of frost.
When should I hire a professional instead of sealing windows myself?
While ground-floor perimeter sealing is a manageable DIY task, there are distinct scenarios where professional window frame repair is the safer choice. You should call a certified technician if:
- The project requires working on high ladders or difficult second-story access.
- The window frame shows signs of structural rot, soft wood, or distorted jambs that require carpentry repair.
- Water is penetrating deep into wall cavities, causing mold growth or interior ceiling stains.
- The window has broken glass or compromised insulated units that require custom glass fabrication and sash rebuilding.
Conclusion
Sealing drafty window frames is one of the most cost-effective home improvement projects you can undertake. By identifying air paths, choosing an ASTM C920-rated exterior sealant, and applying smooth, tooled beads over a closed-cell backer rod, you protect your home against drafts, water intrusion, and climbing energy bills.
If your window inspection reveals rotted wood framing, sticking sashes, or persistent fog trapped between the panes, simple caulking will not solve the underlying problem. For help with leak diagnostics, frame repairs, and precision glass unit replacement across the Pikes Peak Region, contact our professional window repair technicians.