
Why Wood Frame Window Screens Break Down — and What to Do About It
If you need to replace a window screen wood frame, here’s the short version:
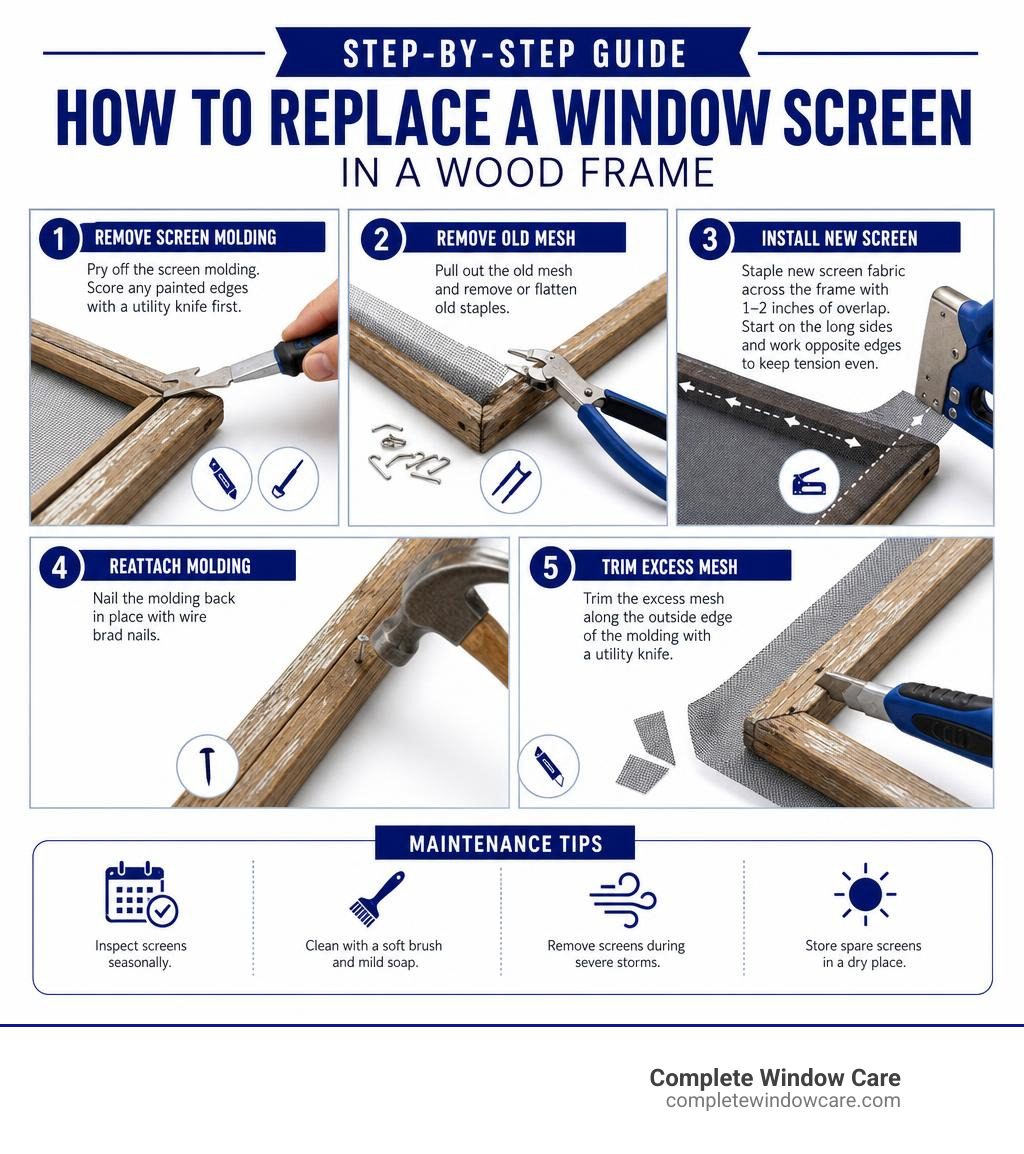
- Pry off the screen molding using a 5-in-1 tool or flathead screwdriver (score any painted edges with a utility knife first)
- Pull out the old mesh and remove or flatten old staples
- Staple new screen fabric across the frame with 1-2 inches of overlap, starting on the long sides and working opposite edges to keep tension even
- Nail the molding back in place with wire brad nails
- Trim the excess mesh along the outside edge of the molding with a utility knife
That’s the core of it. The sections below walk through each step in detail, including tool lists, mesh choices, and how to avoid common mistakes.
Wood moves. It shrinks in dry winters, swells in humid summers, and slowly shifts at the joints over time. That natural movement is exactly why older wood-frame window screens tend to come loose, sag, or let insects in — the frame itself can work against the mesh holding it in place.
The good news? Replacing the screen fabric in a wood frame is genuinely beginner-friendly. Most homeowners finish their first screen in 30-45 minutes, and get it down to 15-20 minutes once they’ve done a couple. Materials typically run just $3 to $8 per screen — a fraction of the $50 to $100 a professional replacement costs.
For Colorado Springs homeowners, this kind of repair matters even more. The region’s intense UV exposure, temperature swings, and hail seasons are hard on screen mesh and wood alike. Catching a torn or sagging screen early — and fixing it properly — keeps insects out and protects the frame from further damage.
I’m Michael Smith, owner of Complete Window Care, and with over 18 years of hands-on experience repairing and replacing windows across Colorado Springs, I’ve helped hundreds of homeowners replace window screens in wood frames without unnecessary costs or full window replacements. This guide covers everything you need to do it right the first time.
Quick related guides:
Tools, Materials, and Screen Mesh Choices for Wood Frames
Before you start pulling molding off the frame, get everything within reach. Wood-frame screens are simple, but they are less forgiving than modern aluminum screens because the trim can split, old paint can seal pieces together, and aged wood may be brittle.
If you want the basics before getting into wood frames, start with our simple screen repair overview.
Tools You Need Before You Start
Gather these tools first:
- Safety glasses and work gloves
- 5-in-1 tool, thin pry bar, or flathead screwdriver
- Utility knife with a sharp blade
- Hammer
- Staple gun
- 1/4-inch staples
- Wire brad nails or small finish nails
- Nail set
- Pliers or end nippers for old staples and nails
- Scissors for rough-cutting screen mesh
- Measuring tape
- Clamps or painter’s tape
- Sanding block
- Wood glue
- Small angle plates or screws for loose joints
- Stable work table or pair of sawhorses
A spline roller is useful for aluminum or vinyl frames, but traditional wood screen frames usually rely on staples and molding instead of spline. If your wood frame has a routed groove and rubber spline, then use a spline roller and match the spline size to the groove.
Materials for a Durable Wood-Frame Screen Repair
You may not need every item, but these are the common materials for a lasting repair:
- Replacement screen mesh
- Screen molding, if the old trim breaks
- Exterior wood filler
- Exterior primer and paint, or exterior stain
- Waterproof wood glue
- 1/4-inch staples
- Brad nails or finish nails
- Thumbtacks for temporary holding
- Rust-resistant fasteners for exterior exposure
If the frame joints are loose, do not skip the glue or reinforcement. A perfectly stretched screen installed on a wobbly frame will sag again. That is like putting new tires on a shopping cart with one wheel doing jazz hands.
How to Choose the Best Screen Material
The best mesh depends on your home, pets, budget, and exposure to sun and weather.
| Screen material | Best for | Pros | Watch-outs |
|---|---|---|---|
| Fiberglass | Most standard window screens | Affordable, flexible, easy for DIY repairs | Less durable around pets and heavy wear |
| Aluminum | Older homes, added strength | Stronger than standard fiberglass | Creases easily and is harder to rework |
| Pet-resistant mesh | Dogs, cats, kids, high-traffic windows | Tough, usually vinyl-coated polyester | Costs more and may reduce visibility slightly |
| Solar screen | Sunny exposures, heat control | Helps reduce glare and heat | Darker look and less airflow |
| High-visibility mesh | Clearer views | Better outward visibility | May cost more than standard fiberglass |
Standard fiberglass screen usually costs around $10 to $15 per roll or kit, while pet-resistant screen often runs closer to $25 to $30. Fiberglass is the easiest for beginners because it has some forgiveness if you need to pull a few staples and re-stretch. Aluminum is stronger, but once it creases, it tends to remember the mistake forever. Very relatable, but not ideal.
In Colorado Springs, UV exposure, wind, hail, and pets are the big decision-makers. Choose pet-resistant mesh if animals push against the screen. Choose solar mesh for hot, sun-facing windows. Choose fiberglass when you want an affordable, clean repair for normal use. If you are trying to figure out what went wrong with your current screen, this guide to common screen repair problems can help.
How to Replace Window Screen Wood Frame: Step-by-Step Process
This is the full process we use when helping homeowners understand how to replace window screen wood frame mesh without damaging the wood.
Prepare the Frame and Work Area
Remove the screen from the window if possible and lay it flat on a sturdy table. Working vertically in the window opening is possible, but it makes tension harder to control.
Before disassembly:
- Label the top, bottom, inside, and outside with painter’s tape.
- Take a quick photo of hardware, clips, or hangers.
- Brush away dust, old paint chips, and loose debris.
- Check whether the frame sits square on the table.
- Inspect corners for separation.
- Protect nearby glass if the screen is still attached to a sash.
If your home was built before 1978, be cautious with old paint. Scoring and prying can disturb paint dust. Wear appropriate protection, avoid sanding unknown paint aggressively, and consider professional help if you suspect lead paint. The EPA’s lead-safe renovation guidance is a helpful reference for understanding the risks of disturbing older painted surfaces.
How to Replace Window Screen Wood Frame Without Damaging Molding
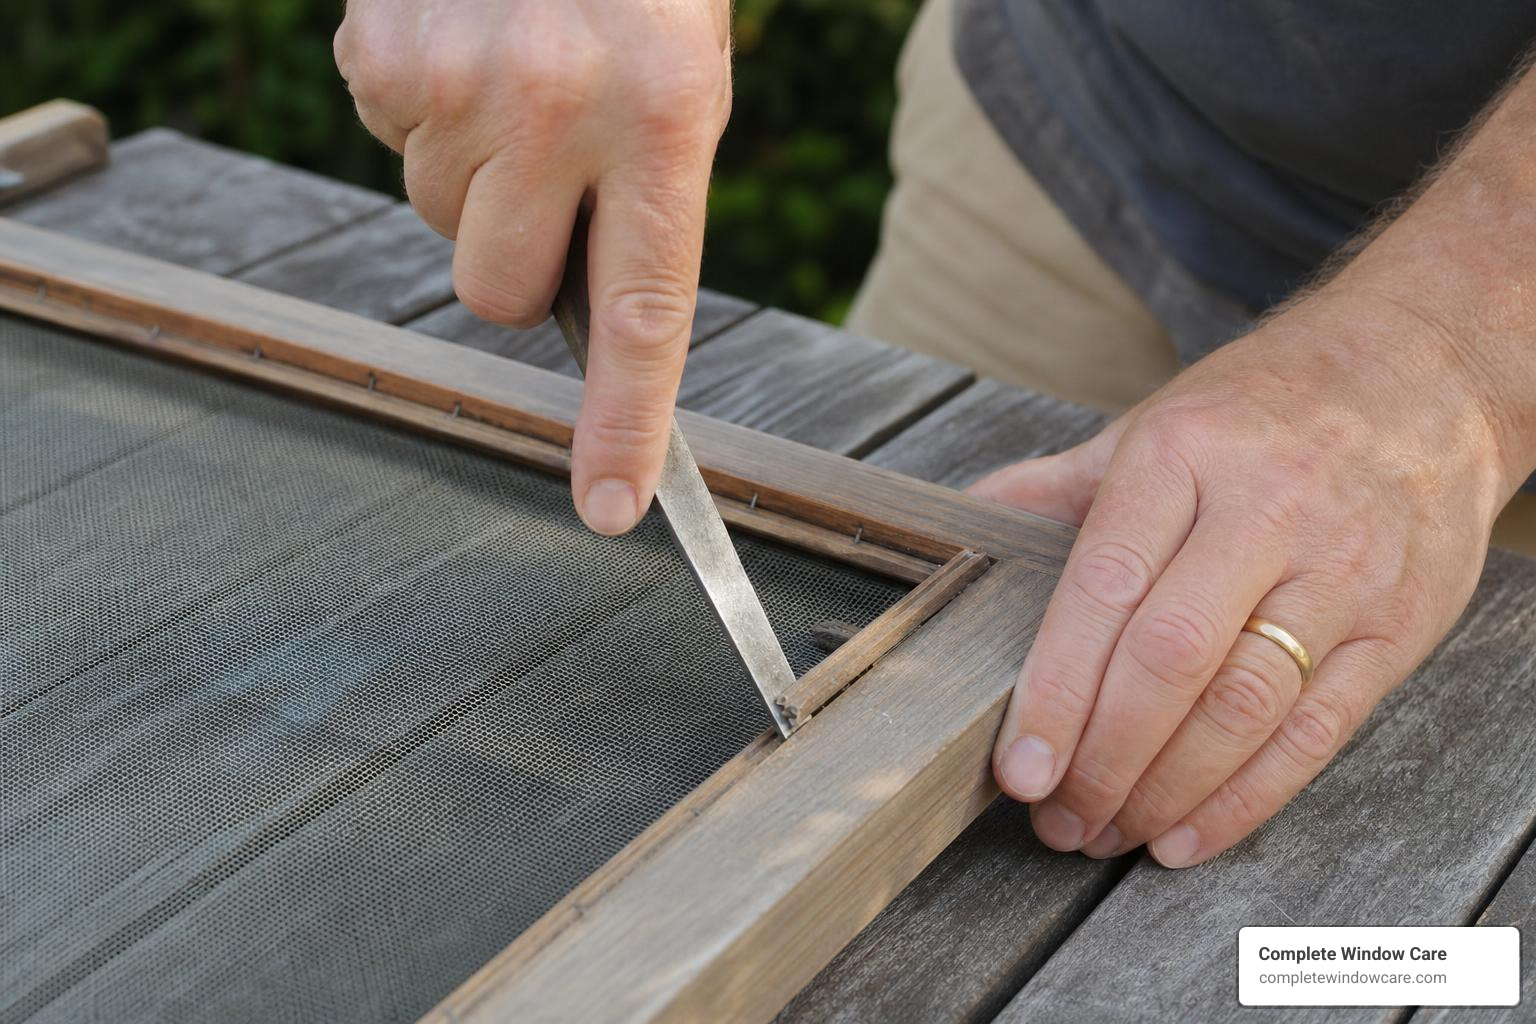
The screen molding is the thin trim that covers the screen edge and staples. It is also the piece most likely to crack if rushed.
Here is the safest removal method:
- Score the paint line with a utility knife where molding meets the frame.
- Start at a corner or existing gap.
- Slide a 5-in-1 tool or thin pry bar under the molding.
- Wiggle gently instead of forcing upward.
- Work a few inches at a time along the trim.
- Pull old finish nails through the back of the molding when possible.
- Number the molding pieces so each one returns to the same side.
Do not pry hard from one spot. That can dent the frame or snap brittle trim. If a piece breaks, save it as a template for replacement molding.
Remove the Old Screen and Repair the Wood
Once the molding is off, pull away the old screen fabric. Remove old staples with pliers, or hammer them flat if they are too rusted or embedded to pull cleanly.
Now inspect the frame carefully:
- Are the corners loose?
- Is the wood soft, punky, or rotten?
- Are rails or stiles warped?
- Are nail holes enlarged?
- Is the frame out of square?
- Is there insect damage?
Small cracks, nail holes, and shallow surface damage can often be fixed with exterior wood filler, sanding, and primer. Loose joints can be strengthened with waterproof wood glue, screws, or small angle plates. If the frame is soft from rot, though, screen fabric will not hold properly for long.
For more repair guidance, read our tips on repairing screen frames like a pro.
How to Replace Window Screen Wood Frame with Tight, Wrinkle-Free Mesh

Cut the new mesh larger than the opening. Leave 1-2 inches of overlap on each side; 2-3 inches is even better for beginners because it gives you more material to grip.
Follow this tension pattern:
- Lay the mesh over the frame.
- Align the screen weave with the frame edges.
- Put one staple near the center of a long side.
- Pull gently across to the opposite long side and staple the center there.
- Move to the center of one short side, then the opposite short side.
- Work outward from the center toward the corners.
- Alternate sides to keep tension even.
- Staple every 1-2 inches, keeping staples flat.
The goal is taut, not drum-tight. Overstretching can bow a wood frame inward or create diagonal wrinkles. Under-stretching causes sagging. If you see a wrinkle forming, stop early, pull the nearest staples, smooth the mesh, and try again.
For corners, fold and smooth the mesh so it does not bunch under the molding. Clamps or thumbtacks can temporarily hold the screen while you fine-tune tension.
Secure the New Screen and Reinstall the Molding
After stapling the screen, reinstall the molding.
Use small brad nails or finish nails. Align each molding piece where it came from, and reuse old nail holes when they still hold well. Nail spacing depends on the trim, but every 6-8 inches is usually enough for small screen molding.
Best practices:
- Do not overdrive nails.
- Use a nail set for a clean finish.
- Keep molding flat against the frame.
- Avoid splitting ends by placing nails slightly away from edges.
- Drill tiny pilot holes if the trim is brittle.
- Check that the mesh stays smooth as molding is fastened.
Once the molding is secure, trim excess screen with a sharp utility knife. Cut along the outside edge of the molding, keeping the blade angled away from the visible mesh. Go slowly. One impatient slice can create a brand-new hole, which is not the victory lap we are looking for.
Test-fit the screen in the window before painting touch-ups. It should sit flat, secure, and square.
Avoid Common Mistakes, Know When to Replace the Frame, and Maintain the Screen
A good screen repair is not only about installing new mesh. It is about preventing the same problem from coming back next season. If the same issues keep showing up, this guide to why window screens fail may help you spot the cause.
Fix Wrinkles, Sagging, and Loose Screens
Wrinkles usually come from uneven tension. Diagonal wrinkles mean one corner or side was pulled harder than the other. Sagging usually means the mesh was not pulled tight enough, the staples were too far apart, or the frame moved after installation.
Fixes:
- Pull a few staples near the wrinkle and re-stretch that section.
- Work opposite sides instead of going all the way around in one direction.
- Keep the screen weave straight with the frame.
- Use more staples if the mesh is slipping.
- Make sure molding is actually pressing the screen edge down.
Fiberglass is easier to correct. Aluminum mesh can crease permanently, so work slowly if you choose metal screen.
Prevent Damaged Wood During Screen Replacement
Wood damage is common when old trim is pried too quickly or nailed too aggressively.
To protect the frame:
- Score painted seams before prying.
- Use gentle leverage from multiple points.
- Drill pilot holes in brittle molding.
- Use sharp blades for trimming.
- Seal exposed wood and end grain.
- Sand rough spots lightly.
- Avoid pressure washing wood screens.
- Repaint or stain exterior wood as needed.
If the wood is dry and splitting, slow down. If it is soft and crumbly, repair may not be enough.
When to Replace the Entire Wood Frame Instead of Just the Screen
Sometimes replacing mesh is the wrong repair. Replace or rebuild the wood frame when you see:
- Rot or soft wood
- Broken rails or stiles
- Badly warped frame
- Separated joints that will not tighten
- Missing or destroyed molding
- Frame that no longer fits the window opening
- Repeated sagging after re-screening
- Insect damage
- Severe out-of-square shape
- Missing screen frame entirely
We believe in cost-effective repairs before full replacements, but the frame must be strong enough to hold tension. If the frame is failing, new mesh is only a temporary bandage. Here is more help deciding when the whole frame needs replacing.
For historic or older homes in the Pikes Peak Region, custom wood screen repair may also preserve the look of the home better than switching to a different frame style.
Maintenance Tips to Extend the Life of a New Wood-Frame Screen
A little maintenance goes a long way.
Use this schedule:
- Spring: Inspect for winter damage, loose molding, and torn mesh.
- Summer: Check sun-facing screens for brittleness and fading.
- After hail or windstorms: Look for punctures, dents, and loosened fasteners.
- Fall: Clean screens before storing or closing up for winter.
Cleaning tips:
- Remove the screen if possible.
- Brush dust away with a soft brush.
- Wash gently with mild soap and water.
- Rinse with low pressure.
- Let the screen dry fully before reinstalling.
- Store removable screens upright, not stacked under heavy items.
Avoid pressure washing, harsh scrubbing, and leaning tools against the mesh. Trim shrubs away from screens, use pet barriers where needed, and touch up exposed wood with paint or stain.
If your screen is already torn, compare repair options for damaged screens before deciding whether to patch, re-screen, or replace it.
Frequently Asked Questions about Replacing Screens in Wood Frames
Is It Cheaper to Replace the Mesh or the Whole Wood-Frame Screen?
Usually, replacing only the mesh is cheaper if the wood frame is still solid. DIY screen materials often cost about $3 to $8 per screen, while professional screen replacement may run $50 to $100 per screen depending on size, material, and condition.
The exception is a damaged frame. If the wood is rotten, warped, or falling apart, replacing only the mesh wastes time and money. For more detail, see our DIY-versus-pro screen repair comparison.
Can I Replace Only Part of a Torn Window Screen?
Yes, small holes can be patched, especially if they are under about one inch. But patches are visible, and they do not solve brittle or aging mesh.
Full re-screening is usually better when:
- There are multiple holes
- The tear is longer than a couple of inches
- Pets damaged the mesh
- The screen is sagging
- The mesh feels dry or brittle
- You want a cleaner appearance
If you are weighing patching against a full repair, start with these practical fixes for damaged screens.
What Is the Best Fastener for Screen Fabric in a Wood Frame?
For most traditional wood-frame screens, 1/4-inch staples are the best fastener for the mesh. They hold well, sit flat, and are hidden by the molding. Thumbtacks can help temporarily hold the mesh while stretching, but they are not usually the best permanent fastener.
For the molding, use small brad nails or finish nails. Choose rust-resistant fasteners for exterior screens whenever possible. Keep fasteners evenly spaced, avoid overdriving them, and use pilot holes near trim ends to reduce splitting.
Conclusion
Replacing screen fabric in a wood frame is a straightforward repair when you follow the right order: prepare the frame, remove molding carefully, repair weak wood, stretch the new mesh evenly, reinstall the molding, and trim cleanly.
The biggest keys are patience and tension control. Do not rush the molding removal. Do not pull the mesh so tight that the frame bows. Do not ignore loose joints or soft wood. When the frame is solid and the mesh is installed evenly, a wood-frame screen can look clean, fit properly, and keep Colorado Springs insects outside where they belong.
At Complete Window Care, we focus on practical, cost-effective repairs whenever possible. If your screen, frame, glass, or window leak issue needs a professional look, we are here to help homeowners throughout Colorado Springs and the Pikes Peak Region.
Contact us today or explore our screen repair and replacement options to get the right fix for your windows.