
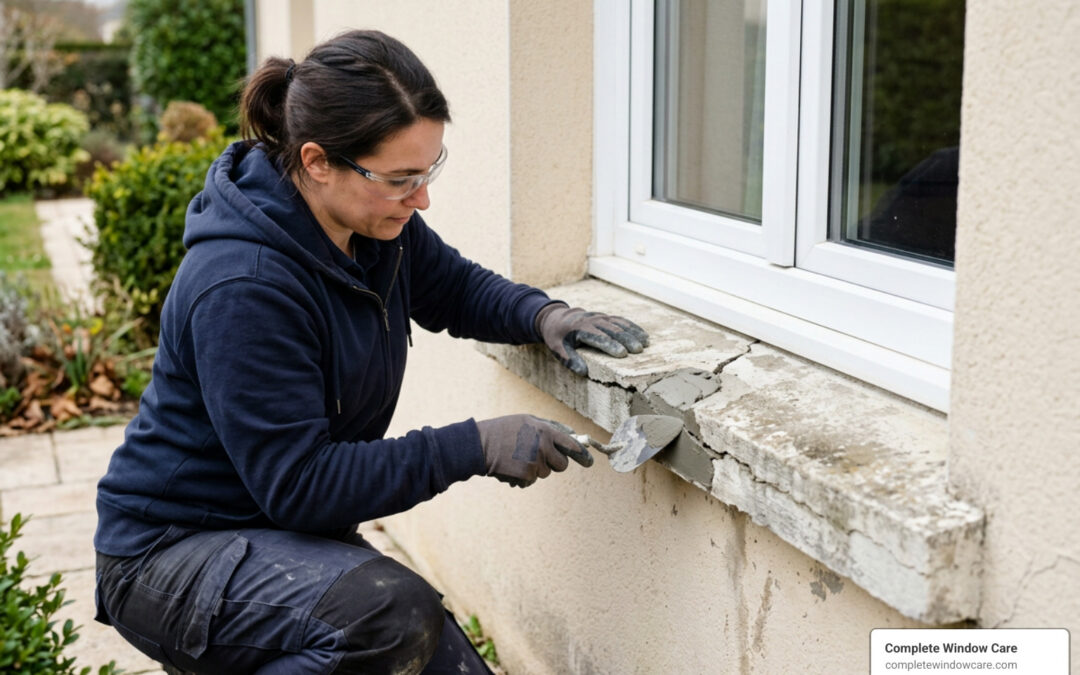
Restoring Damaged Concrete Window Sills: Fast Fixes for Lasting Protection
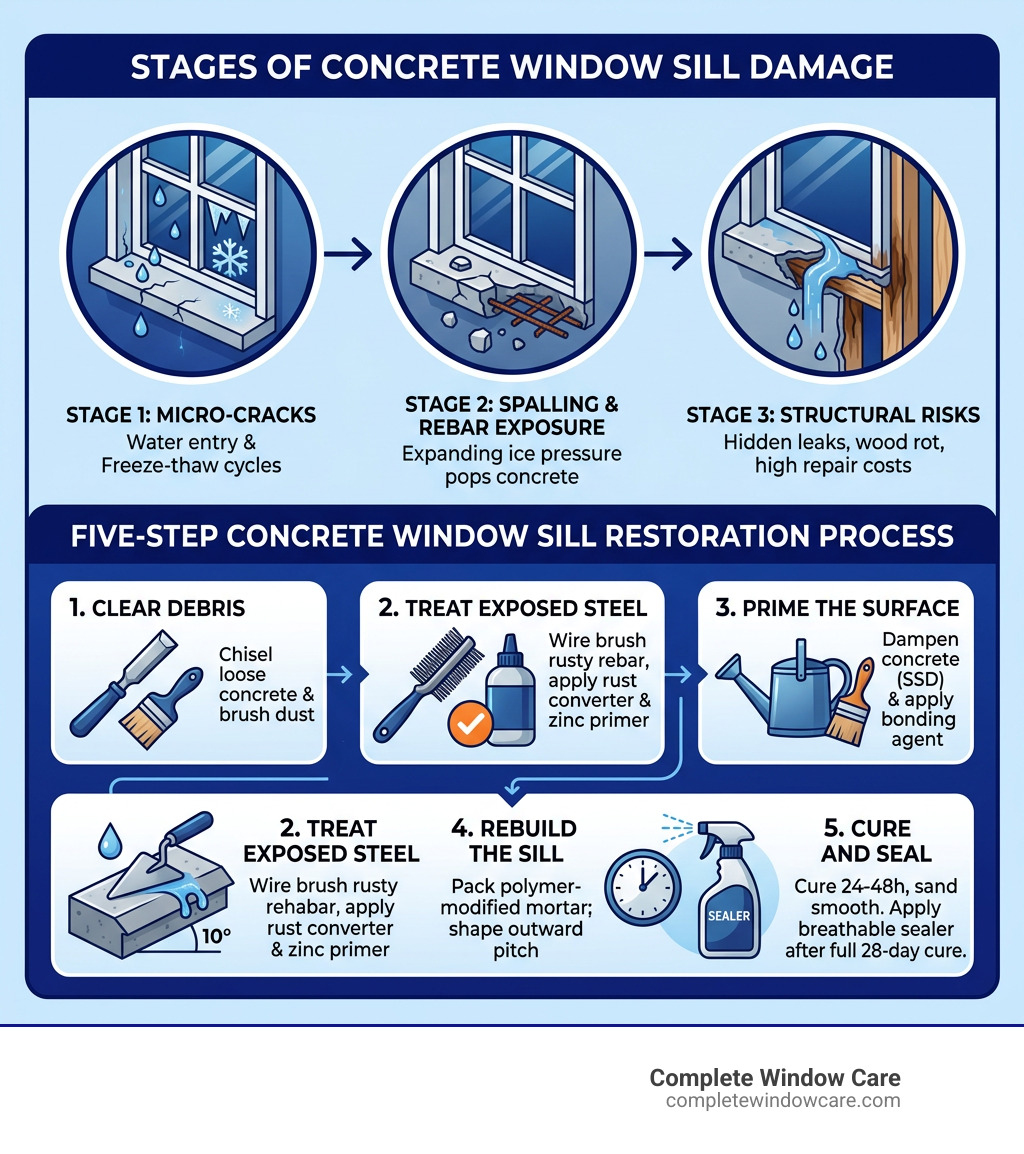
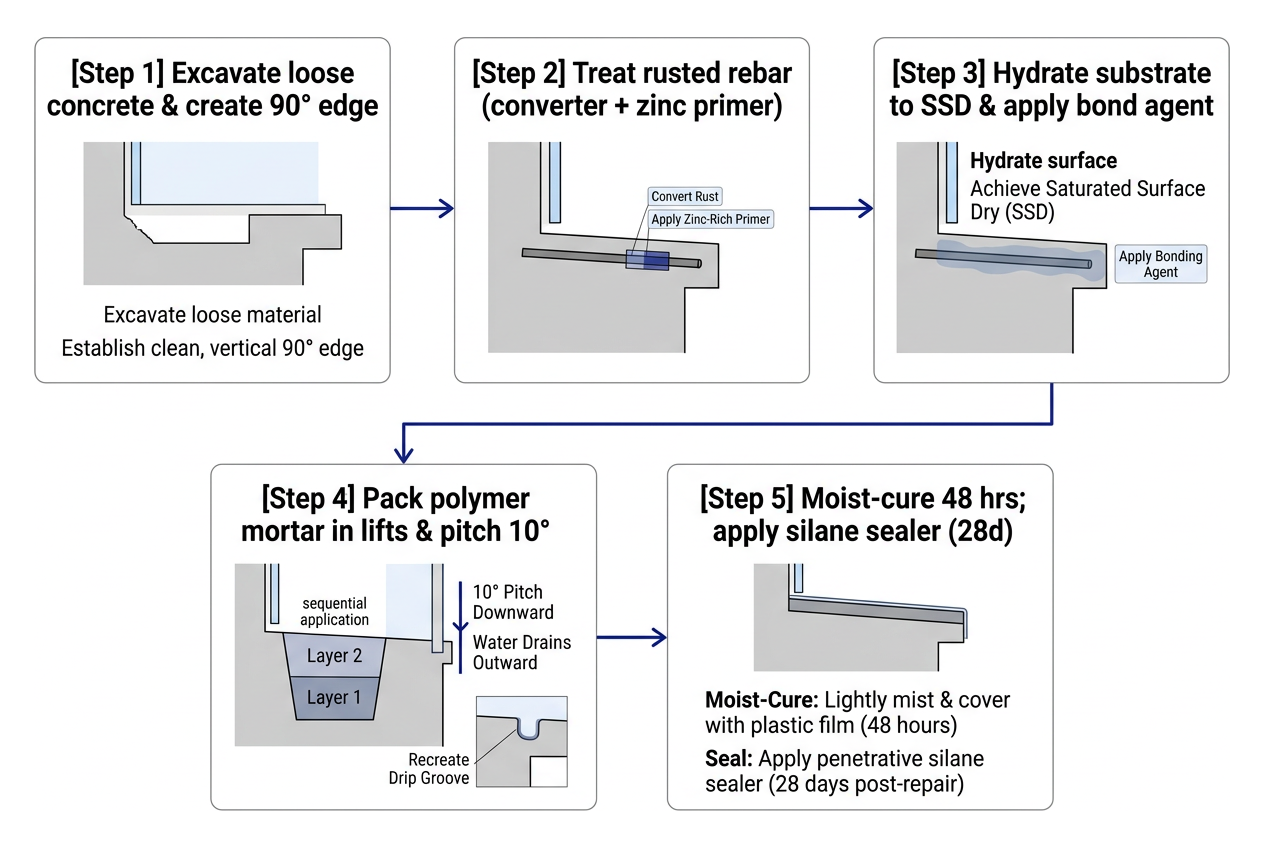
To perform a lasting concrete window sill repair, follow this proven five-step restoration process:
- Clear loose debris: Chisel away cracked, flaking concrete until you reach solid masonry, then brush away all dust.
- Treat exposed steel: Scrub rusty rebar with a wire brush, apply a rust converter, and coat it with a zinc-rich primer.
- Prime the surface: Dampen the concrete to a saturated surface-dry (SSD) state and brush on a dedicated concrete bonding agent.
- Rebuild the sill: Pack a polymer-modified repair mortar into the void in layers, shaping a 10-degree outward pitch to shed water away from your wall.
- Cure and seal: Allow the mortar to set for 24 to 48 hours before sanding smooth, then apply a breathable silane-siloxane sealer after a full 28-day cure.
Exterior concrete window sills take the brunt of severe weather. When water seeps into tiny micro-cracks and freezes, it expands by about 9%. That expansion exerts massive internal pressure, popping off chunks of concrete (spalling) and exposing structural rebar to moisture. Leaving a cracked sill unattended invites hidden water leaks, wood rot in your wall framing, and costly structural repairs.
I’m Michael Smith, owner of Complete Window Care and an AAMA-certified instructor with over 18 years of hands-on experience solving water intrusion issues and concrete window sill repair. In this guide, I’ll show you how to fix damaged sills yourself using professional techniques that keep your home dry and solid.
Handy concrete window sill repair terms:
Assessing Concrete Sill Damage: Repair vs. Replacement
Before grabbing your hammer and chisel, you need to inspect the condition of your window sill. Many homeowners worry that any noticeable fissure means the entire window structure is ruined. Fortunately, in our experience across the Pikes Peak region, most damaged sills can be saved without tearing out surrounding masonry. Recognizing common window problems early helps you decide whether a DIY patch will hold or if advanced intervention is necessary.
Sills endure high thermal stress, horizontal wind-driven rain, and heavy snow loads. Over time, these conditions create visible surface distress:
- Surface Spalling: Flaking or chipping layers on the top and outer face of the concrete.
- Vertical Cracking: Fissures extending from the window jamb downward through the sill profile.
- Efflorescence: White, powdery mineral deposits left behind when evaporating water carries internal salts to the exterior.
- Delamination and Hollow Voids: Hidden internal separations between the concrete matrix and reinforcing steel.
- Water Pooling: Loss of drainage pitch, causing moisture to sit against the bottom window frame.
Whenever the structural core of the masonry remains intact, choosing to repair rather than replace preserves your building envelope while saving thousands of dollars compared to a complete frame tear-out.
Identifying Common Damage Patterns
Diagnosing concrete damage requires more than a quick glance. Tap along the length of your window sill using the wooden handle of a margin trowel. A sharp, solid “clack” indicates sound concrete beneath. A dull, hollow “thud” reveals delamination: meaning the outer concrete has detached internally and must be chipped away.
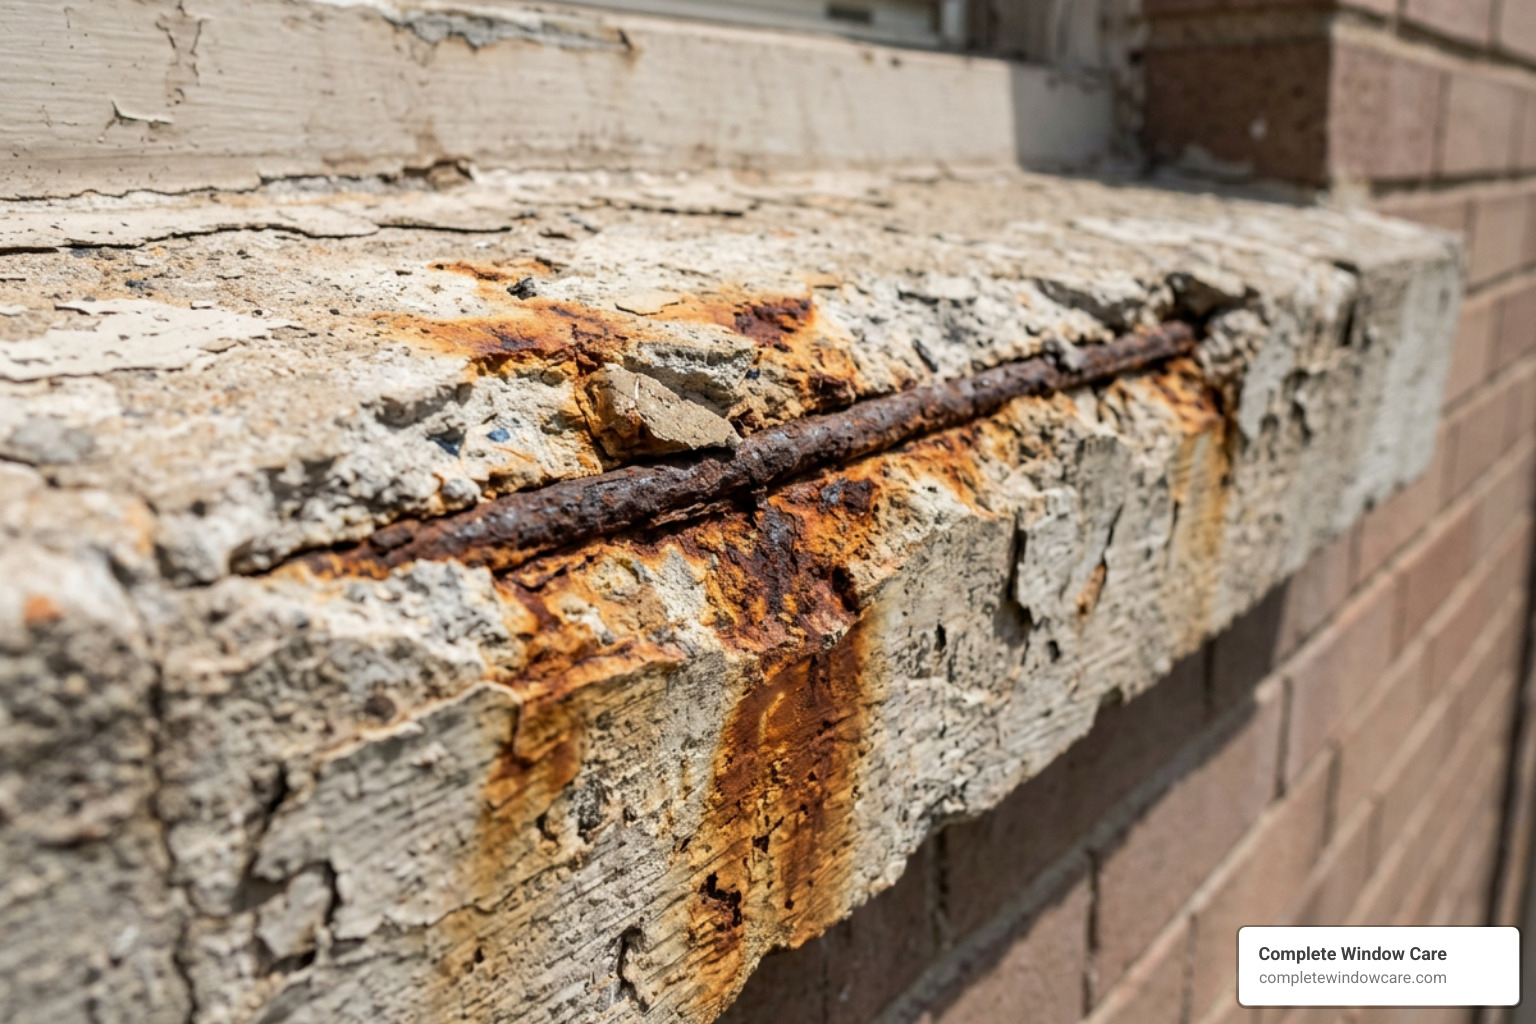
Look closely at hairline fissures. If a crack is under 1/16 inch wide and exhibits no displacement, it can generally be sealed with an exterior elastomeric compound or flexible silicone latex caulk. However, cracks wider than 1/4 inch, missing corner chunks, or orange-brown rust bleeding require deep structural excavation. Rust staining is an unmistakable warning sign: water has reached the internal reinforcing steel, and corrosion is actively splitting the sill from within.
Freeze-Thaw Cycles and Corrosion Mechanisms
Why do concrete window sills fail? The main culprit in cold and high-altitude climates is the freeze-thaw cycle. Concrete is naturally porous, functioning like a dense sponge. When liquid water enters micro-cracks and freezes, it expands by approximately 9%, forcing the concrete to split from the inside out.

When cracks deepen, moisture and oxygen reach the reinforcing steel. As rebar oxidizes, the rust can expand to several times the steel’s original volume, creating enough pressure to crack and dislodge surrounding concrete: a form of spalling often called “rebar cancer.” To help prevent the moisture exposure that drives this damage, follow the City of Colorado Springs’ concrete-maintenance guidance alongside regular sill inspections and prompt crack repairs.
Tools and Materials for Concrete Window Sill Repair
Achieving a professional-grade repair requires selecting materials engineered specifically for vertical and sloped exterior masonry. Standard bagged gravel-mix concrete from a big-box store will fail quickly because it lacks the adhesion and tensile flexibility needed for thin, feathered repairs.
| Material Type | Best Use Case | Tensile Bond Strength | Set / Working Time |
|---|---|---|---|
| Polymer-Modified Mortar | Deep spalls, profile rebuilding, corner restoration | High (polymer additive bonds to old concrete) | 30–45 mins work time; 2-hour initial set |
| Two-Part Epoxy Filler | Narrow vertical cracks, structural anchor pinning | Very High (rigid structural bond) | 15–20 mins rapid cure |
| Hydraulic Cement | Active water leaks, rapid filling under damp conditions | Moderate (expands slightly as it sets) | 3–5 mins ultra-fast set |
| Exterior Silicone Caulk | Small surface cracks (<1/8 in), perimeter window perimeter joints | Flexible (accommodates building movement) | 24 hours full cure |
Essential Materials for Concrete Window Sill Repair
- Polymer-Modified Repair Mortar: A high-performance cementitious blend enriched with synthetic polymers to provide superior bond strength, water resistance, and freeze-thaw durability.
- Concrete Bonding Agent: An acrylic or latex-based liquid primer that creates a chemical bridge between existing cured concrete and fresh mortar.
- Phosphoric Acid Rust Converter: A chemical treatment that neutralizes active iron oxide on exposed steel rebar, converting it into an inert iron phosphate layer.
- Zinc-Rich Epoxy Primer: A rust-inhibitive metal primer that prevents future galvanic corrosion on steel reinforcements.
- Vapor-Permeable Masonry Sealer: A silane-siloxane penetrating sealer that repels liquid water while allowing internal moisture vapor to escape.
- Clean Potable Water and Washed Sand: For substrate cleaning and blending mix textures where required.
Preparation Gear and Specialty Masonry Tools
- PPE: Safety goggles, heavy leather work gloves, and a NIOSH-approved P100 dust respirator (silica dust protection is critical when chiseling concrete).
- Masonry Cold Chisel and 2.5 lb Club Hammer: For chipping away deteriorated concrete and creating mechanical edges.
- Wire Cup Brush & Angle Grinder (or Hand Wire Brush): For scrubbing rust off rebar and scouring aggregate clean.
- Margin Trowel & Finishing Trowel: For packing mortar into deep cavities and striking smooth, uniform planes.
- Digital Bevel Gauge or Small Torpedo Level: To confirm the correct outward watershed slope.
- Spray Bottle: To mist the repair zone and maintain optimal hydration.
- Medium-Grit (80 to 120-grit) Sanding Block: For refining cured edges.
Step-by-Step Concrete Window Sill Repair Process
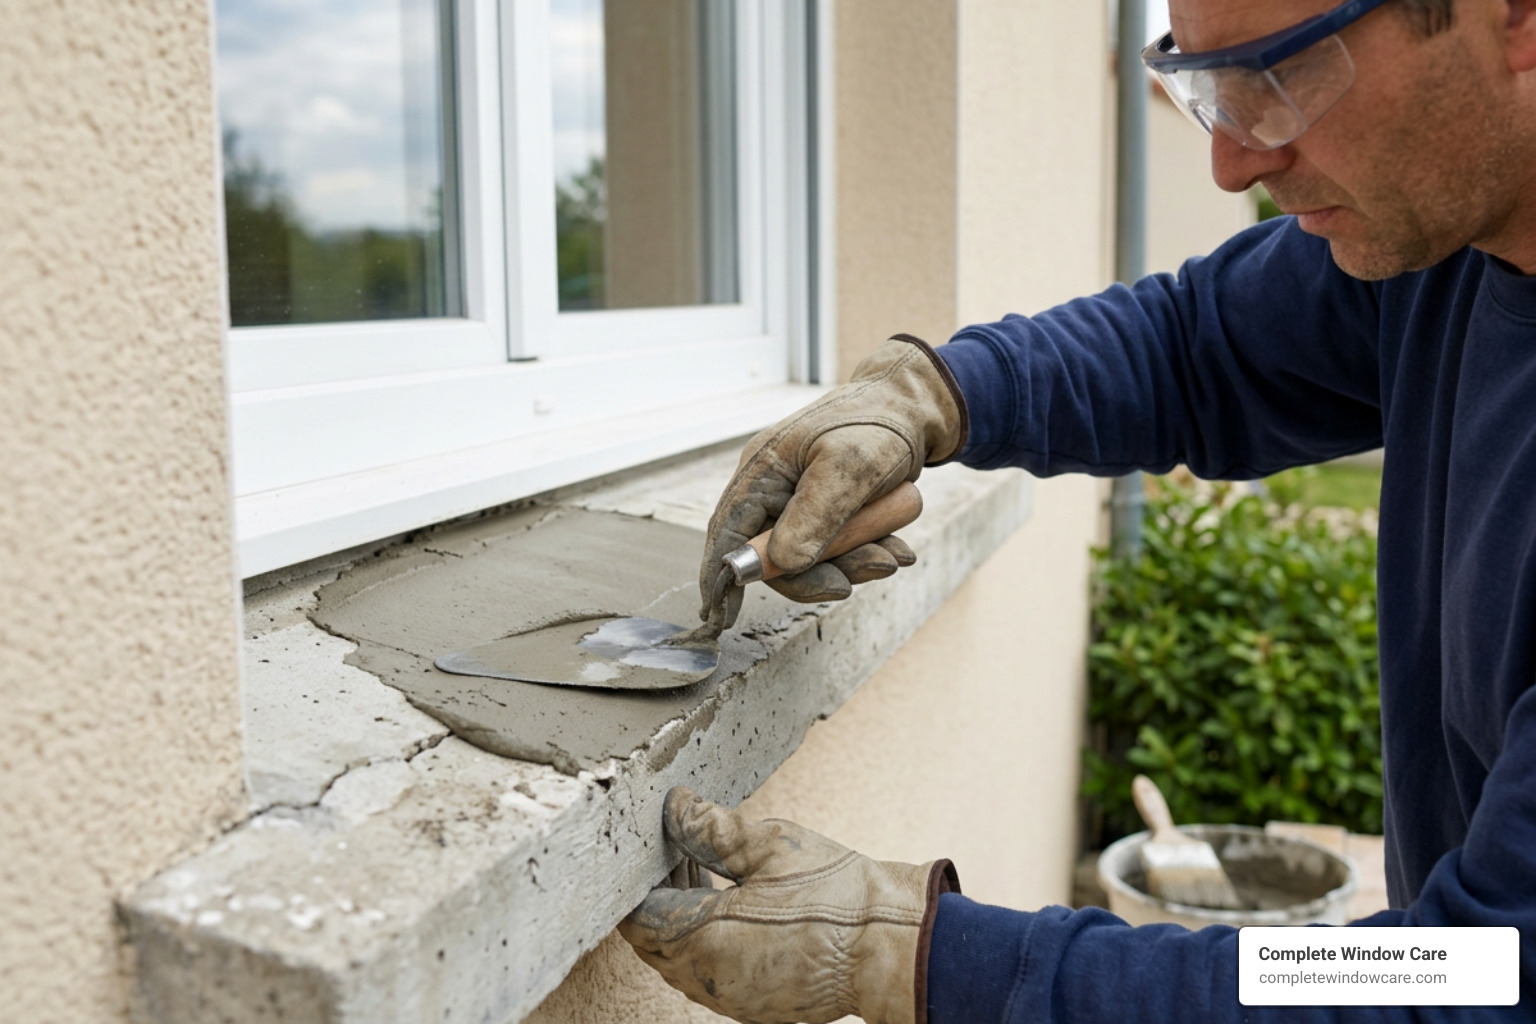
Neglecting an open fracture can turn a minor surface patch into a full-blown emergency. Addressing window leaks promptly prevents moisture from migrating into your framing studs and insulation. Let’s walk through the full restoration process step by step.
Surface Preparation and Rebar Treatment
A repair is only as strong as the surface beneath it. New mortar cannot adhere to dirty, flaking, or dusty substrates.
- Excavate Damaged Areas: Place your cold chisel at a 90-degree angle to the sill surface. Chip away all loose, crumbly concrete until you strike hard, sound aggregate. Undercut the edges of the repair area slightly (creating a clean, square shoulder of at least 1/4 inch deep) rather than feathering the patch to a paper-thin edge. This gives the mortar mechanical retention.
- Scour and Clean: Use a stiff wire brush or an angle grinder fitted with a wire wheel to strip away carbonation, dirt, and loose particles. Vacuum the entire area thoroughly to remove fine dust.
- Treat Corroded Reinforcement: If steel rebar is exposed, chisel away the concrete around it until you have at least 3/4 inch of clear space behind the bar. Scrub the metal clean of flaking scale. Apply a phosphoric acid rust converter and allow it to cure (typically 12 hours) until the steel turns jet black. Once dry, coat the rebar with a zinc-rich metal primer. Pro Tip: If the rebar has lost more than 20% of its original diameter, consult a structural professional, as supplemental steel anchoring may be required.
- Achieve Saturated Surface-Dry (SSD) Condition: Soak the cleaned concrete cavity with clean water using a spray bottle or sponge for 15 minutes before applying your patch. Right before patching, wipe away standing surface puddles. The concrete should look damp and dark, but have no standing water. This prevents the old dry masonry from sucking the moisture out of your fresh mortar.
- Apply Bonding Agent: Brush an undiluted layer of acrylic concrete bonding primer directly onto the damp substrate, working it into every pore.
Applying Polymer Mortar and Contouring Pitch
Now you are ready to rebuild the structural profile of the sill.
- Mix the Mortar: Mix your polymer-modified mortar in a clean bucket according to the manufacturer’s directions. Aim for a firm, moldable consistency similar to heavy peanut butter: stiff enough to hold its shape on a vertical edge without sagging.
- Pack in Lifts: For repairs deeper than 1.5 inches, apply the mortar in sequential layers (lifts). Firmly press the first 1-inch layer into the cavity with a margin trowel, ensuring zero trapped air pockets. Use the edge of your trowel to score a crosshatch pattern into the surface. Allow it to firm up for 20 to 30 minutes before applying the subsequent layer.
- Restore the 10-Degree Pitch: The top face of an exterior window sill must never be completely flat. Shape the mortar with your finishing trowel so it slopes downward and outward at a 10-degree angle (roughly a 1-inch drop for every 6 inches of run). This slope ensures driving rain drains quickly away from the window frame.
- Recreate the Drip Edge: If the repair extends along the underside of the outer sill lip, ensure the capillary drip groove remains clear. This small groove prevents water from rolling backward along the underside of the sill and entering the exterior wall cladding.
Curing, Sanding, and Surface Finishing
Concrete cures through chemical hydration, not simply evaporation. If the repair dries out too quickly in direct sunlight or dry mountain winds, the mortar will weaken and develop shrinkage cracks.
- Moist Curing: Once the mortar reaches its initial set (about 2 to 4 hours after placement), lightly mist the patch with water and cover it loosely with a sheet of plastic film or damp burlap. Keep it shielded from direct sun and heavy rain for the first 48 hours.
- Sanding & Profiling: After 24 to 48 hours, remove the plastic. Use an 80-grit to 120-grit masonry sanding block to smooth rough trowel ridges, flush the patch with the adjacent sill lines, and refine the drip edge. Brush away all sanding dust. For deeper structural insights and trade methods, explore pro-level sill restoration methods to see how specialists handle tricky architectural contours.
Sealing, Painting, and Preventive Maintenance
Rebuilding the concrete profile is only half the battle; protecting it from future weather exposure ensures your hard work lasts for decades. Integrating these steps into your seasonal checklist alongside other essential spring window maintenance keeps your exterior walls watertight year-round.
Applying Breathable Penetrating Sealers
The most common mistake homeowners make after a patch is coating fresh concrete with standard exterior latex paint or a thick, non-breathable clear coat. Topical film-forming coatings trap moisture within the sill. When winter comes, that trapped water freezes and blows the new patch clean off.
Instead, use a deep-penetrating silane-siloxane sealer:
- Capillary Protection: Silane-siloxane penetrates up to 3/8 inch into concrete capillaries, chemically reacting with the silica matrix to form a hydrophobic (water-repelling) barrier.
- Vapor Permeability: It stops liquid rain from soaking in, while allowing internal moisture vapor to escape harmlessly into the air.
- Cure Window: Wait a full 28 days after applying polymer mortar before sealing or painting. This allows the concrete to complete its primary hydration and its high surface pH to neutralize. If you plan to paint, apply two coats of high-grade exterior breathable elastomeric masonry paint over the cured, primed repair.
Long-Term Sill Care and Inspection Routines
Perform a close inspection of all exterior sills twice a year (spring and autumn):
- Check the Perimeter Caulking: Inspect the flexible sealant bead where the concrete sill meets the bottom window frame and brick jambs. If the caulk is cracked, dried out, or pulled away, cut it out and recaulk with a high-performance polyurethane or hybrid polymer sealant.
- Clear Debris and Biological Growth: Wash away accumulated dirt, moss, or lichen using a soft-bristled brush and mild detergent. Biological growth retains moisture against the concrete face.
- Inspect Drain Paths: Ensure screens and weep slots above the sill are clear of dirt so water drains outward unimpeded.
Evaluating Project Costs: DIY vs. Professional Services
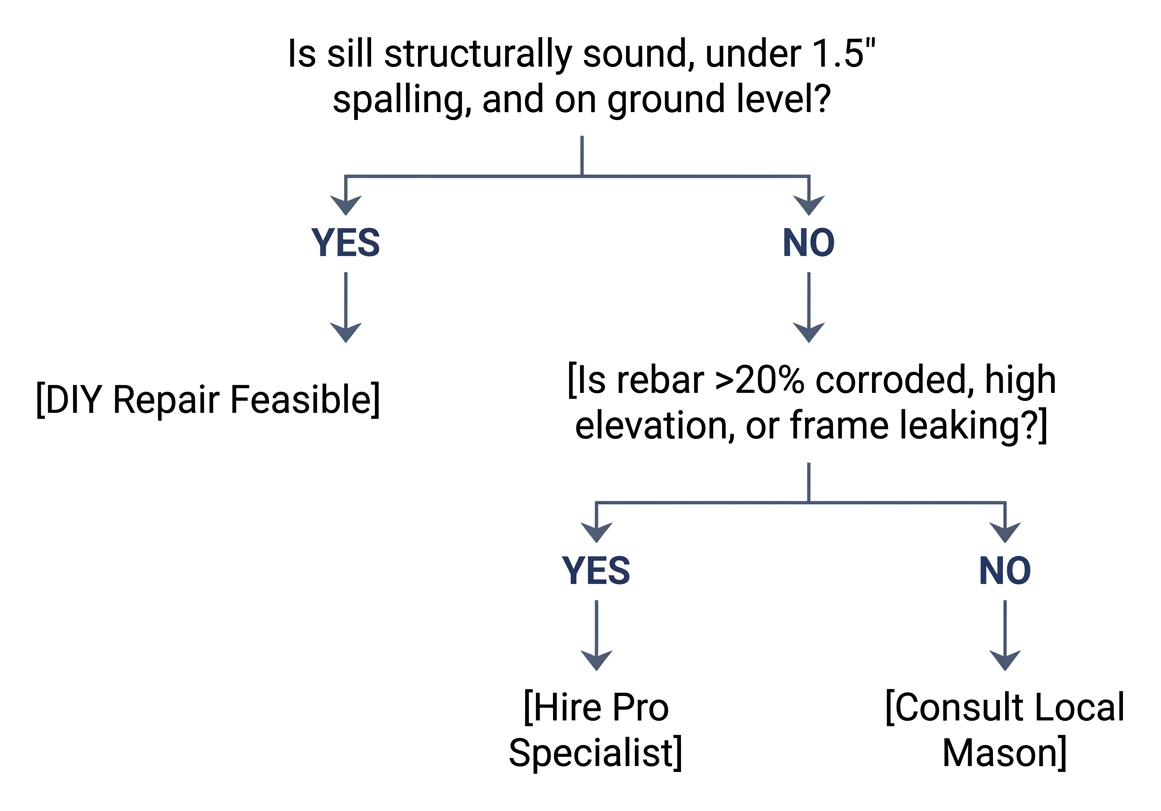
Deciding whether to tackle a window sill repair yourself or hire an experienced team comes down to damage severity, tool availability, and safety risks.
Cost Breakdown: DIY vs. Professional Concrete Window Sill Repair
Repairing a single ground-floor window sill yourself is very budget-friendly:
- Bag of polymer-modified repair mortar: Affordable per 20–50 lb bag.
- Concrete bonding adhesive: Inexpensive per quart.
- Rust converter & zinc primer: Modest investment for long-term protection.
- Silane-siloxane penetrating sealer: Economical protection per gallon.
- Masonry hand tools (trowels, chisel, wire brush): Low one-time cost.
When you hire a professional window and masonry restoration crew, the cost reflects skilled labor, professional setup, commercial-grade bonding resins, and complete structural warranties. Professional services also include exterior ladder staging, correct fall-protection gear, and precise color-matching to preserve your home’s architectural integrity.
When to Hire a Window Specialist
While surface patching is well within reach for most DIYers, certain red flags demand professional expertise:
- Severe Rebar Deterioration: If the reinforcing steel has rusted through completely or lost more than 20% of its thickness, structural reinforcement pinning is required.
- Window Misalignment: If the window frame above the sill is binding, sticking, or showing frame corner separation, the lintel or foundation may be shifting.
- Extensive Interior Water Infiltration: If drywall beneath the window is soft or stained, water has likely penetrated the framing cavity. Review our guide on choosing the right window repair service to find a certified technician who can perform a comprehensive leak audit.
- Second-Story Access: Working on high ladders with heavy masonry tools poses significant safety hazards.
If you suspect internal window framing issues or require professional glass inspection, knowing how to prepare for a window repair appointment will help ensure a seamless, efficient repair visit.
Frequently Asked Questions About Concrete Window Sill Repair
Can regular cement be used for concrete window sill repair?
No. Standard Portland cement mixes contain coarse aggregate and lack the polymer bonding agents necessary to adhere to old, existing concrete. Standard cement will crack, shrink, and delaminate when applied in thin patches on vertical or sloped profiles. Always use an engineered polymer-modified repair mortar.
How long does concrete sill repair take to cure before painting?
Most polymer repair mortars reach their initial set in 2 to 4 hours and are hard enough for light profiling and sanding after 24 to 48 hours. However, you should wait 28 days for the patch to fully cure and for its alkalinity (pH level) to balance before applying exterior masonry paints or penetrating sealers.
What is the 10-degree rule for exterior concrete window sills?
The 10-degree rule specifies that the top surface of an exterior concrete window sill must slope downward and outward away from the window frame at a minimum 10-degree angle. This slope relies on gravity to shed rainwater and melting snow, preventing water from pooling against the window frame and deteriorating the building facade.
Conclusion
A damaged, spalling window sill is more than just an eyesore—it is an open doorway for moisture intrusion that threatens your home’s structural framing. By taking a proactive approach, preparing your substrate thoroughly, treating exposed steel rebar, and shaping a durable polymer-modified mortar with a proper watershed slope, you can restore your home’s curb appeal and weather protection.
If your window restoration project involves deep internal framing leaks, glass seal failure, or complex second-story access, our team at Complete Window Care is here to help with our cost-effective professional window repair services. Invest an afternoon in restoring your concrete sills today, and enjoy a dry, weather-tight home for years to come!