

Why Wooden Window Frame Repairs Are Worth Doing Before It Gets Worse
Wooden window frame repairs are often simpler — and far more affordable — than most homeowners expect. Before you assume a damaged frame means a full window replacement, here’s a quick answer:
How to repair a wooden window frame (overview):
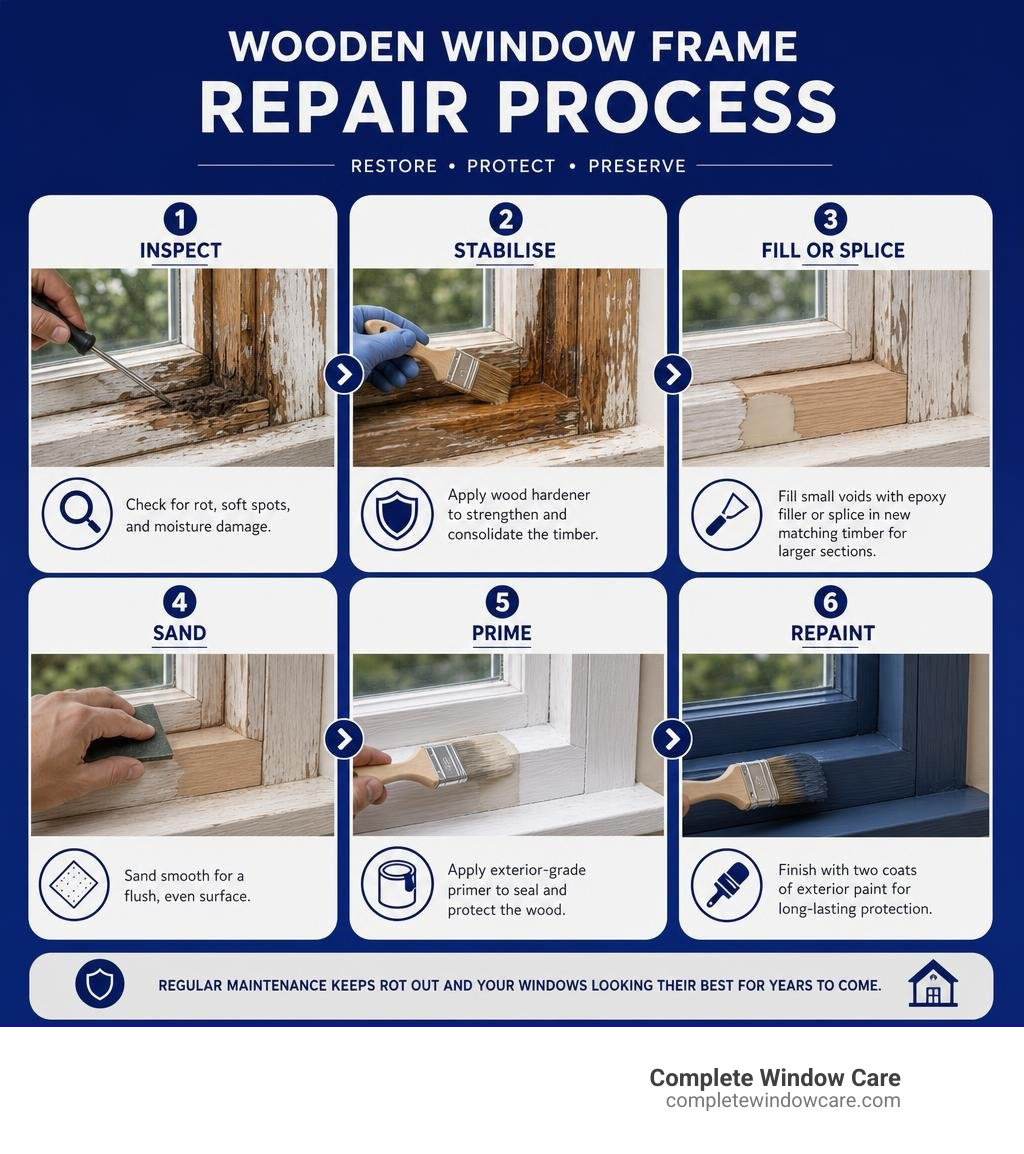
- Inspect — probe soft spots with a screwdriver or knife; check sills, corners, and jamb bases
- Dry out — remove moisture sources and let timber dry fully before any repair
- Remove decay — scrape or chisel out all rotten wood until you reach solid material
- Stabilise — apply epoxy consolidant (wood hardener) and let it cure
- Fill or splice — use two-part epoxy filler for small voids, or splice in new matching timber for larger sections
- Sand, prime, and paint — finish with exterior-grade primer and two coats of paint, sealing all end grain
- Maintain — inspect annually and repaint every few years to prevent rot returning
Wood windows are tough. In fact, up to 40% of older wooden window frames in the UK show signs of rot — yet most of those can still be saved. The same is true here in Colorado Springs, where freeze-thaw cycles, hail, and intense sun put real stress on painted timber. A frame that looks beyond saving on the surface is often structurally sound just a few millimetres deeper. That’s the whole point of diagnosing before you decide.
Repairing a single frame typically costs a fraction of full replacement — and a properly repaired window can last another 10 years or more with basic upkeep. Homeowners who repair rather than replace also preserve the original wood character of their home — something no modern vinyl or aluminium unit can replicate.
I’m Michael Smith, owner of Complete Window Care, and with over 18 years of hands-on experience diagnosing and fixing wooden window frame repairs across Colorado Springs and the Front Range, I’ve seen first-hand how early action saves homeowners thousands. In the sections below, I’ll walk you through exactly how to assess, repair, and protect your wood frames the right way.
How to Diagnose Wooden Window Frame Repairs Before You Pick Up a Tool
Before grabbing your hammer and chisel, we need to understand exactly what we are dealing with. Water is wood’s primary enemy, but it doesn’t work alone. Moisture intrusion often starts subtly. It creeps behind peeling paint, gets trapped by failing caulk, or slowly pools in the lower corners of your window assembly.
When inspecting your windows, look closely for bubbling paint, water stains, and cracked glazing. If you notice your window sash binding when you try to open it, or if you feel cold drafts on a windy Colorado winter evening, these are classic signs of structural swelling or warping. Condensation on the glass is another major contributor, especially on the interior sills of older homes during our freezing winters.
To find the trouble spots, pay close attention to the sill ends, jamb bases, mullions, and any exposed end grain. These areas absorb moisture like a sponge. We highly recommend using a digital wood moisture meter to verify the moisture content of the wood. If the reading is above 17% to 20%, the wood is in the danger zone where wet rot and dry rot fungi thrive.
You can perform a simple “screwdriver test” or pocketknife probe. Gently push the tip of a flathead screwdriver or pocketknife into suspect spots. If it sinks in like cold butter, you have rotted wood that requires immediate attention. If you want more help identifying what is going wrong, start with our guide to common window issues or review this technical guide to repairing wood windows for a deeper look at historic timber preservation.
The Most Common Causes of Wooden Window Frame Damage
Understanding why your frames failed in the first place is the only way to ensure your wooden window frame repairs last. In our experience servicing homes throughout the Pikes Peak Region, the most common culprits include:
- Rain and Snow Exposure: Standing water on flat surfaces, combined with Colorado’s rapid freeze-thaw cycles, splits paint films.
- Failed Caulk and Paint: Once the protective coating cracks, raw wood absorbs moisture.
- Blocked Weep Paths: Many modern and retrofitted wood windows have weep holes to drain water. When these get clogged with dirt or paint, water backs up into the frame.
- Poor Head Flashing: If water isn’t directed away from the top of the window, it runs directly behind the trim.
- Splashback: Rain dripping from rooflines without gutters splashes dirt and moisture onto the lower window sills.
- Intense UV Damage: The high-altitude Colorado sun bakes paint until it chalks, cracks, and peels, leaving the raw wood unprotected.
How to Spot Rot, Water Damage, and Structural Problems
Rotting wood behaves differently depending on whether you are dealing with wet rot or dry rot. Wet rot is far more common in window sills. It causes the wood to become soft, spongy, and dark, often accompanied by paint ripples and a musty smell. Dry rot, though rarer in windows, is highly destructive. It draws moisture out of the wood, leaving it brittle, cracked across the grain, and crumbly.
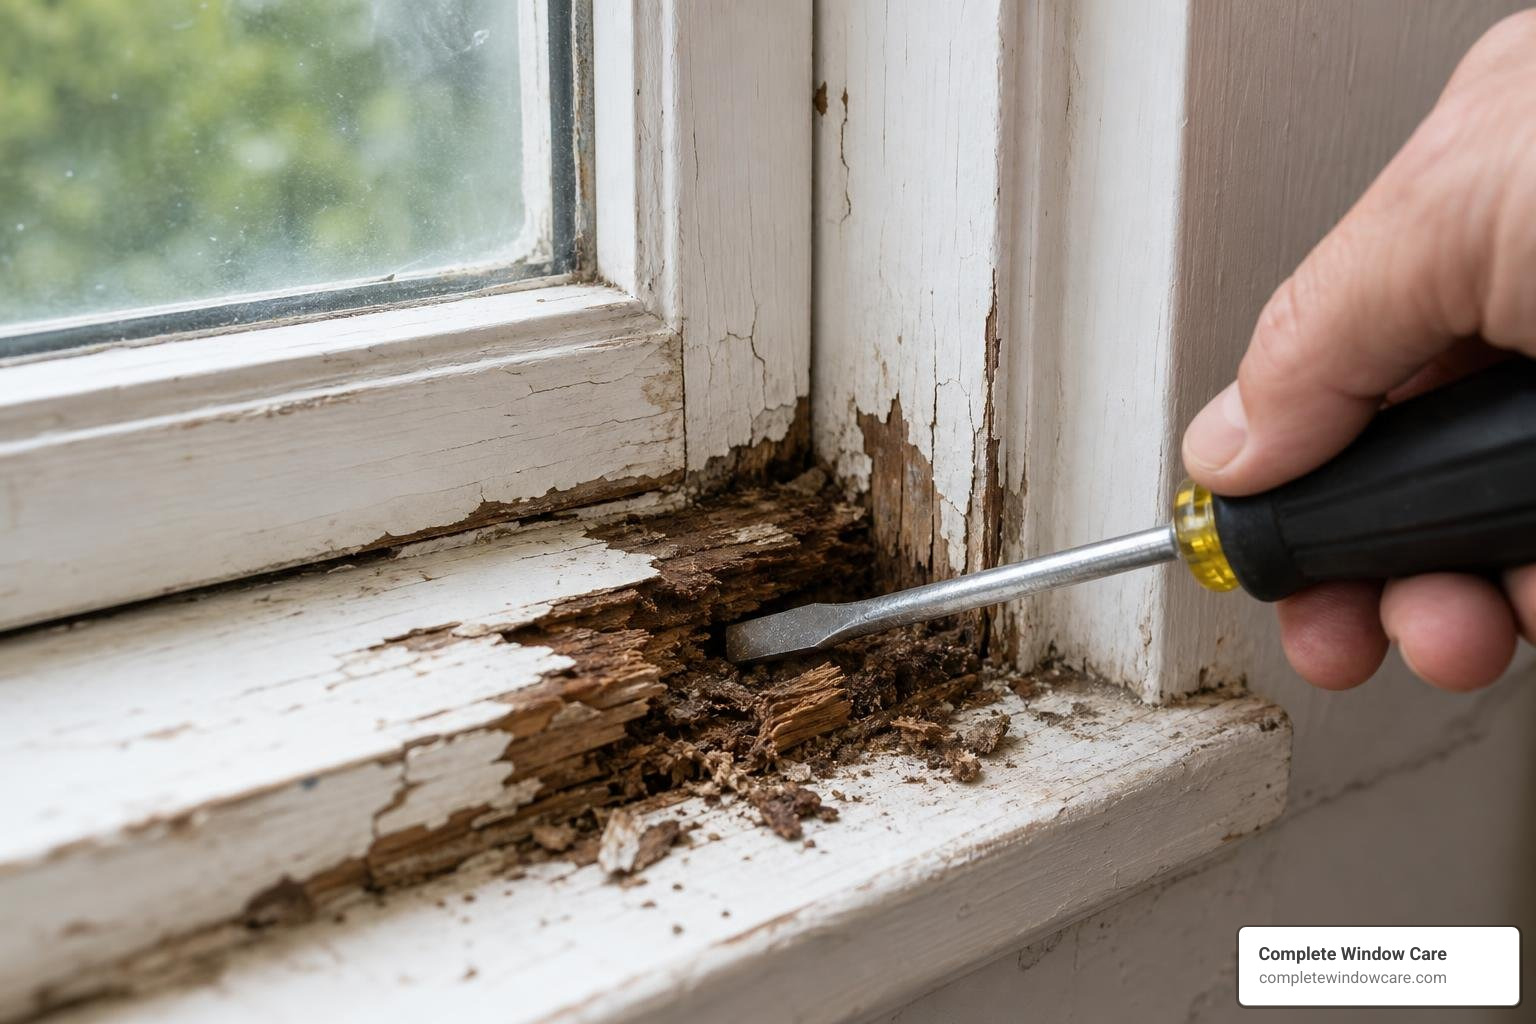
To assess the structural integrity of your frame, try to wiggle the joint connections. If there is visible glass movement, a rattling sash, or if the frame has warped so severely that the window no longer locks, the structural stability of the window is compromised. A knife-probe depth of more than 15mm across multiple faces of a joint usually indicates deep decay that may require a partial timber replacement rather than a simple epoxy fill.
Why Early Inspection Saves Money
Taking a proactive approach to window maintenance is one of the smartest financial decisions you can make as a homeowner. When you catch rot early, you can resolve it with minor filling or localized epoxy consolidation. This completely avoids the massive expense and disruption of tearing out the entire window frame, which often damages your interior drywall and exterior siding.
Furthermore, keeping your original wood windows in good shape preserves the high-quality, old-growth lumber often found in older homes. This wood is denser and naturally more rot-resistant than modern pine replacements. By sealing up drafts and keeping the frame tight, you can save up to 30% on your home heating and cooling costs. If you suspect your windows are costing you money, our guide to poor window performance can help you spot the warning signs.
Tools and Materials Needed for Wooden Window Frame Repairs
To complete a professional-grade repair, you need the right gear. Here is a list of the essential tools and materials you should gather before starting:
- Safety Gear: Nitrile gloves (essential for handling epoxy), safety glasses, dust mask, and a lead paint test kit.
- Hand Tools: Utility knife, paint scraper, sharp wood chisel, hammer, putty knife, and a bradawl or pocketknife for probing.
- Diagnostic & Prep Tools: Digital moisture meter, sanding block, orbital sander, wire brush, and painter’s tape.
- Repair Materials: Epoxy consolidant (liquid wood hardener), two-part epoxy wood filler, exterior-grade wood filler, and matching replacement timber (if splicing).
- Finishing Materials: High-quality exterior-grade paintable caulk, backer rod, oil-based or stain-blocking primer, exterior acrylic latex paint, and glazing compound.
Choosing the Right Filler, Consolidant, or Timber Patch
The secret to a repair that stands up to the elements is matching the material to the type of damage:
- Epoxy Consolidants (Liquid Hardeners): Excellent for wood that is slightly soft but structurally intact. The liquid penetrates deep into the wood fibres, curing into a rock-hard, waterproof plastic base.
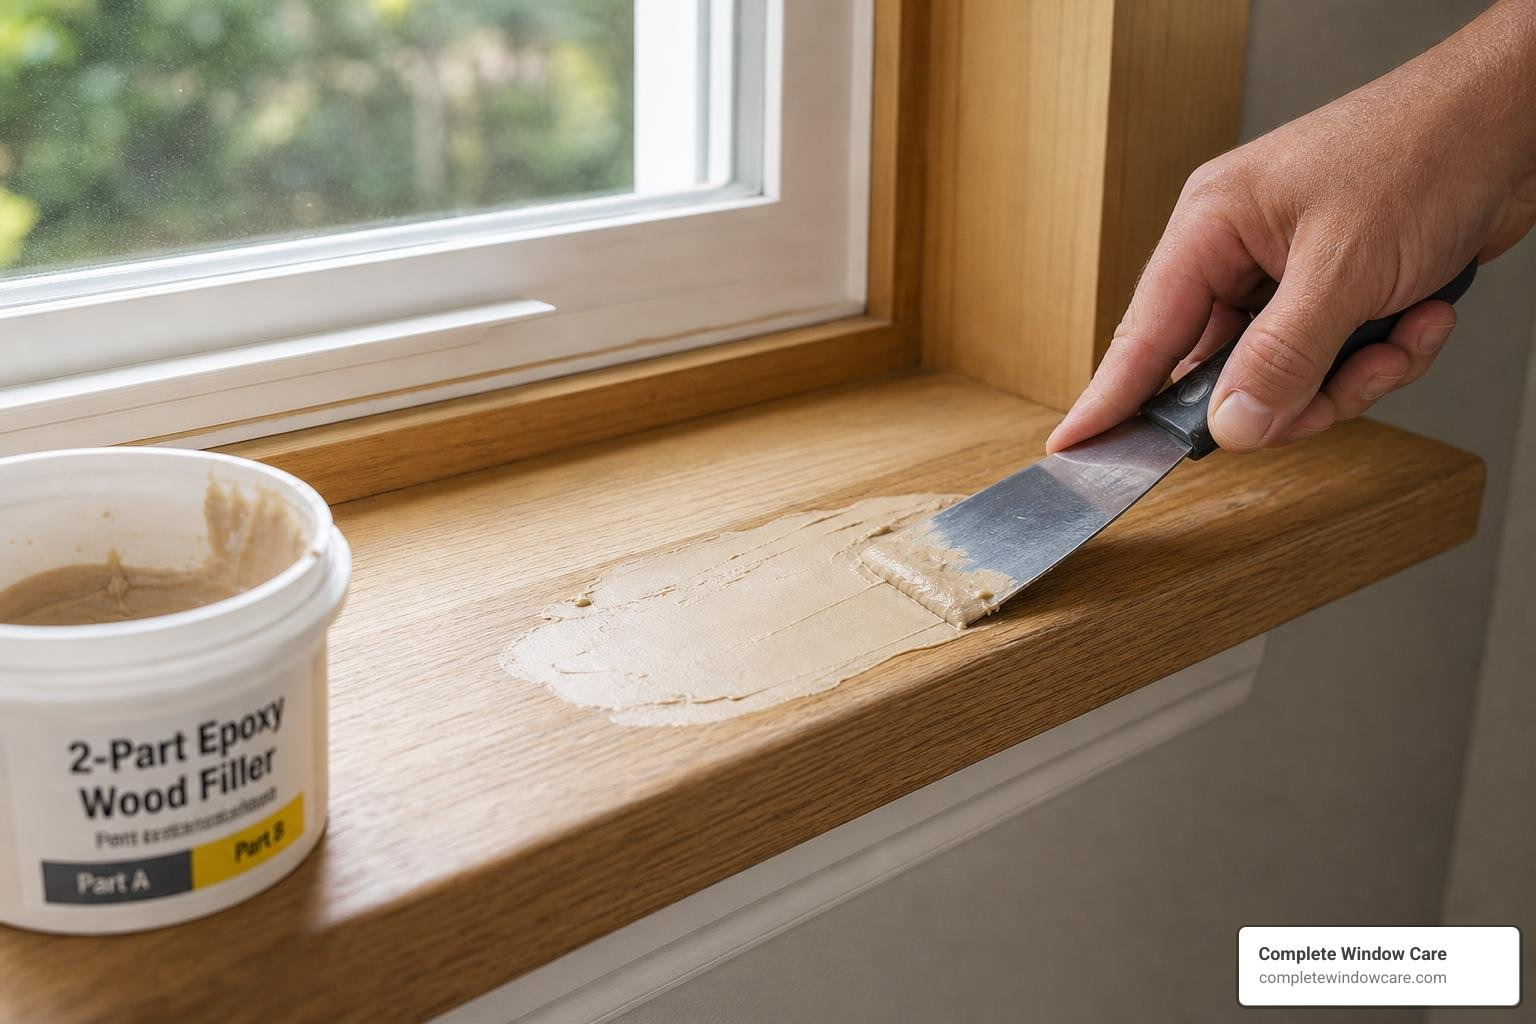
- Two-Part Epoxy Putty: Best for filling medium-to-large voids where wood has been removed. Epoxy bonds chemically with the consolidated wood, remains slightly flexible to accommodate seasonal expansion, and won’t shrink over time.
- Dutchman Patches & Splice Repairs: If more than 20% of a sill or jamb is rotted, filler isn’t enough. You must cut away the bad section and glue in a matching piece of wood (a “Dutchman” patch) using waterproof epoxy adhesive. Always match the wood species, grain direction, and moisture content of the original frame.
Safety Gear and Setup for Older Homes
If your home in the Pikes Peak Region was built before 1978, there is a very high probability that the window frames contain lead-based paint. Disturbing lead paint releases toxic dust.
Before sanding or scraping, use a lead test kit. If lead is present, you must follow lead-safe work practices: use plastic containment sheeting to isolate the work area, wet-sand surfaces to keep dust down, and clean up thoroughly with a HEPA vacuum. Never use a dry power sander on lead paint. Always wear a properly fitted N95 or HEPA respirator, safety glasses, and durable gloves.
Step-by-Step Wooden Window Frame Repairs for Minor and Major Damage
Now that you’ve diagnosed the issue and gathered your tools, let’s look at how to execute the actual wooden window frame repairs.
If the weather forecast calls for rain, or if you need to take a window sash to your garage or shop for repairs, always seal up the open window space securely. A piece of exterior-grade plywood cut to size and temporarily secured in the opening will protect your home from the elements. For additional step-by-step guidance on structural restoration, you can also review this wooden frame repair walkthrough.
Wooden Window Frame Repairs for Minor Rot, Cracks, and Surface Damage
For localized rot (less than the size of a tennis ball) and shallow cracks, follow this process:
- Clean the Surface: Scrape away all flaking paint and loose dirt around the damaged area.
- Remove the Rot: Use a chisel, scraper, or wire brush to gouge out all dark, crumbly, rotted wood. Keep digging until you hit clean, light-colored, solid timber.
- Dry the Wood: Ensure the wood moisture content is below 17%. If it’s damp, let it dry naturally or use a heat gun on a low setting (avoiding lead paint areas).
- Apply Wood Hardener: Brush a generous coat of liquid epoxy consolidant onto the exposed wood. Let it soak in. Apply multiple coats until the wood maintains a glossy appearance, then let it cure according to the manufacturer’s instructions.
- Mix and Apply Epoxy Filler: Mix your two-part epoxy filler. Press it firmly into the void with a putty knife, pack it tight to eliminate air pockets, and leave it slightly proud of the surrounding wood surface.
- Sand and Shape: Once fully cured (typically 12 to 24 hours), sand the filler flush with the wood frame using 80-grit followed by 120-grit sandpaper.
- Prime and Paint: Apply a high-quality exterior primer, followed by two coats of premium exterior paint.
Wooden Window Frame Repairs for Major Rot, Broken Corners, or Failed Sills
When sills are severely rotted or corners have split apart, a simple filler repair won’t last. You need to perform a timber splice or Dutchman repair:
- Cut Away the Damage: Use a multi-tool or handsaw to cut out the rotted section of the sill or jamb. Make clean, straight cuts into sound wood, preferably at a slight downward angle to help shed water.
- Prepare the Replacement Timber: Cut a piece of matching wood (such as cedar, fir, or redwood) to perfectly fit the removed section. Make sure the grain runs in the same direction as the original wood.
- Back-Prime the Patch: Paint all hidden faces and cut ends of the new wood piece with a primer before installation. This prevents moisture from wicking into the back of the joint.
- Glue and Fasten: Apply a marine-grade waterproof epoxy adhesive to the mating joints. Press the new wood block into place, clamp it tightly, and secure it with corrosion-resistant stainless steel screws.
- Fill the Seams: Fill any tiny gaps at the joints with epoxy filler, sand smooth once cured, and paint to match.
Repairing Glass, Glazing Putty, and Drafty Gaps at the Same Time
While you are fixing the wood frame, it is the perfect time to address the glass and seals. Old glazing putty dries out, cracks, and falls away, allowing water to leak directly behind the wood sills.
Carefully scrape away the old brittle putty using a putty knife (a heat gun can help soften stubborn putty, but be careful not to crack the glass). Secure the glass pane with fresh glazier’s points, then apply a neat bead of traditional glazing compound or a modern paintable polymer sealant.
If your double-pane windows look foggy or have condensation trapped between the glass, this indicates a failed seal. To compare repair options by frame type, take a look at our window material guide.
Repair or Replace? How to Make the Cost-Effective Decision
Many window sales representatives will tell you that a rotten frame means you must replace the entire window. This is rarely the case. To help you decide what makes the most financial sense for your home, we’ve put together this quick comparison table:
| Feature / Factor | Repairing the Existing Frame | Full Window Replacement |
|---|---|---|
| Average Cost | ~£250 ($300–$450 USD) per frame | $800–$1,500+ per window installed |
| Lifespan | 10+ years (with regular maintenance) | 15–25 years (for vinyl/composite) |
| Disruption | Low; worked from outside, trim stays intact | High; siding/drywall often disturbed |
| Aesthetic Value | Preserves historic character and old-growth wood | Can look out of place on historic homes |
| Environmental Impact | Low; keeps materials out of landfills | High; old window goes to landfill |
For a deeper dive into this comparison, see why we often recommend repairing instead of replacing.
When Repair Is Usually the Smarter Choice
Repairing is almost always the best path forward if:
- The rot is localized and affects less than 20% of the entire frame.
- The core structural joints of the window are still tight and stable.
- You have historic wood windows with dense, high-quality timber that is worth saving.
- The window operates smoothly, and the damage is primarily cosmetic.
When Full Replacement Becomes Necessary
You should consider a full replacement if:
- The wood rot has spread throughout the entire frame, including the structural mullions and deep into the wall framing.
- The window frame is severely warped or out-of-square, making it impossible to open, close, or lock properly.
- The cost of custom carpentry repairs approaches or exceeds the cost of a high-quality new window.
DIY vs Professional Repair Decisions
While a handy homeowner can easily tackle minor epoxy fills and painting over a weekend, major structural repairs are best left to the pros. Splicing sills, rebuilding historic sash profiles, and handling extensive lead paint mitigation require specialized carpentry tools and experience.
Here in Colorado, our homes are subjected to intense wind, hail, and heavy snow loads. A poorly executed DIY repair can trap water inside the wall cavity, leading to hidden structural rot and costly mold issues down the road.
Sanding, Priming, Painting, and Preventing Future Rot
The longevity of your wooden window frame repairs depends entirely on the quality of your finishing work. If you skip steps during sanding, priming, or painting, moisture will find its way back into the wood within a year. If you are comparing wood to other frame materials, our vinyl frame repair guide explains where vinyl repairs differ.
Best Practices for Sanding and Surface Preparation
- Sand with the Grain: Always sand in the direction of the wood grain to avoid leaving deep scratches that show through the paint.
- Feather the Edges: Sand the transition zones where old paint meets bare wood until the surface feels completely smooth to the touch.
- Clean Thoroughly: Vacuum away all sanding dust, then wipe the entire frame down with a tack cloth or a damp rag. Let the wood dry completely before applying any coatings.
Priming and Painting Repaired Wooden Frames
Never apply paint directly to bare wood or epoxy filler. You must use a high-quality, exterior-grade, stain-blocking primer (oil-based primers are excellent for sealing raw wood and blocking tannin bleed).
Once the primer is dry, apply two thin, even coats of premium exterior acrylic latex paint. Acrylic paint remains flexible when dry, allowing it to stretch and contract with the wood during our extreme Colorado temperature swings without cracking. Pay special attention to the bottom edges of sills and sash corners — these require complete paint coverage to block water.
Maintenance That Helps Repairs Last 10+ Years
To get the absolute most out of your restored wood windows, establish a simple seasonal maintenance routine:
- Bi-Annual Inspections: Walk around your home every spring and autumn. Look for hairline cracks in the paint, split caulk joints, or signs of peeling.
- Keep Weep Holes Clear: Ensure that any drainage paths or weep holes in the frame are free of dirt, leaves, and paint buildup.
- Manage Landscaping: Trim back bushes and tree branches so they don’t rub against your windows or trap moisture against the wood.
- Redirect Sprinklers: Ensure your lawn sprinklers do not spray directly onto your wooden window frames.
Frequently Asked Questions About Wooden Window Frame Repairs
Can Rotted Wooden Window Frames Really Be Repaired?
Yes! As long as the rot hasn’t compromised the structural integrity of the entire wall opening, rotted wood can be cut out, stabilized with consolidants, filled with high-strength epoxies, or spliced with fresh timber to restore the frame to its original strength and beauty.
How Long Do Wooden Window Frame Repairs Last?
With proper surface preparation, high-quality epoxy products, and regular paint maintenance, a professional wood frame repair can easily last 10 to 15 years — often outlasting the surrounding original paint.
What Safety Precautions Matter Most?
Always test for lead paint on homes built before 1978. Wear a HEPA respirator, safety glasses, and chemical-resistant gloves when working with epoxies, solvents, or scraping old paint. Ensure your work area is well-ventilated and keep children and pets away from curing chemicals.
Conclusion
At Complete Window Care, we believe in a repair-first approach. Your original wood windows have character, historical value, and structural integrity that modern replacement windows struggle to match. By investing in timely wooden window frame repairs, you can save thousands of dollars, improve your home’s energy efficiency, and preserve the classic look of your property.
If you suspect your wood windows are showing signs of rot, water damage, or wear, don’t wait for the damage to spread. Schedule professional repair services with our experienced team in Colorado Springs today, and let us help you save your wood — and your wallet!